Conceptual design using coordinate optical measurements
Project carried out as part of an engineering diploma thesis
Year: 2021
university: Politechnika Krakowska im. Tadeusza Kościuszki
Field of study: Industrial design engineering
PROJECT OBJECTIVE
The aim of the project was to create a complete, ergonomic, and comfortable equipment for walking at heights - stilts. The project should be simple enough to use, so that it could be used by beginners, but designed in such a way as to meet the requirements of people who use stilts on a daily basis.
WHAT I VALUE MOST ABOUT THE PROJECT
What I appreciate most is that the skills I acquired during my studies allowed me to design and create a prototype of the device, so that it was an actual, ready-to-test product. I appreciate that this project did not end with the development of a concept, but was also implemented.

Issue
Stilts are an invention known to us for centuries. We associate them mainly with the circus world, parades, and street theater. In the past, it was also a very useful tool that was used instead of a ladder, for example, when picking fruit. Stilts are often used in very difficult conditions, which I could see for myself when I worked for three years in street theater. The work usually requires several hours spent continuously at height. Weather conditions are also not favorable to users, because performances take place all year round regardless of the weather. They are used in rain, snow, heat and strong winds. The number of solutions used by each user is surprising. Stilts, although known to us for centuries, have not evolved. Their spectrum has been broadened. There are stilts on which you can only jump. There are also those that are construction stilts and you can do renovation work on them. However, there are no peg stilts that would be comfortable, you could buy them in a store or get spare parts for them. Instead, they are taped to the leg, or digging-in mounting straps with a buckle are used. A board with a sponge wrapped in tape is used as knee protection. It is difficult to have pleasant working conditions with such equipment, but it is also not conducive to people who are just starting their adventure with stilts. It is difficult to start practicing this sport, with the need to create equipment for it at the very beginning, when we have no knowledge on the subject. The work aims to respond to these needs as best as possible. That is why the current solutions and other industries, whose elements can find interesting applications, were analyzed very carefully. In the design process, the technology of coordinate optical measurements was used to adapt the product as much as possible in terms of ergonomics to the user. The project was also analyzed in terms of the materials used to build the current solutions.
RESEARCH RESEARCH RESEARCH
users
/types of users
professionals
People who use stilts for professional purposes. Regardless of whether we are dealing with a stilt walker, an animator, or a person walking on construction stilts.
Hobbyists
People who treat stilts as a sport or hobby.
/purpose of stilts
entertainment industry
circus / street theatre / classical theatre / cinematography
work
fruit picking / construction work / minor housework
RECREATION
toys for children / learning stilt walking / combining stilts with other disciplines
current solutions
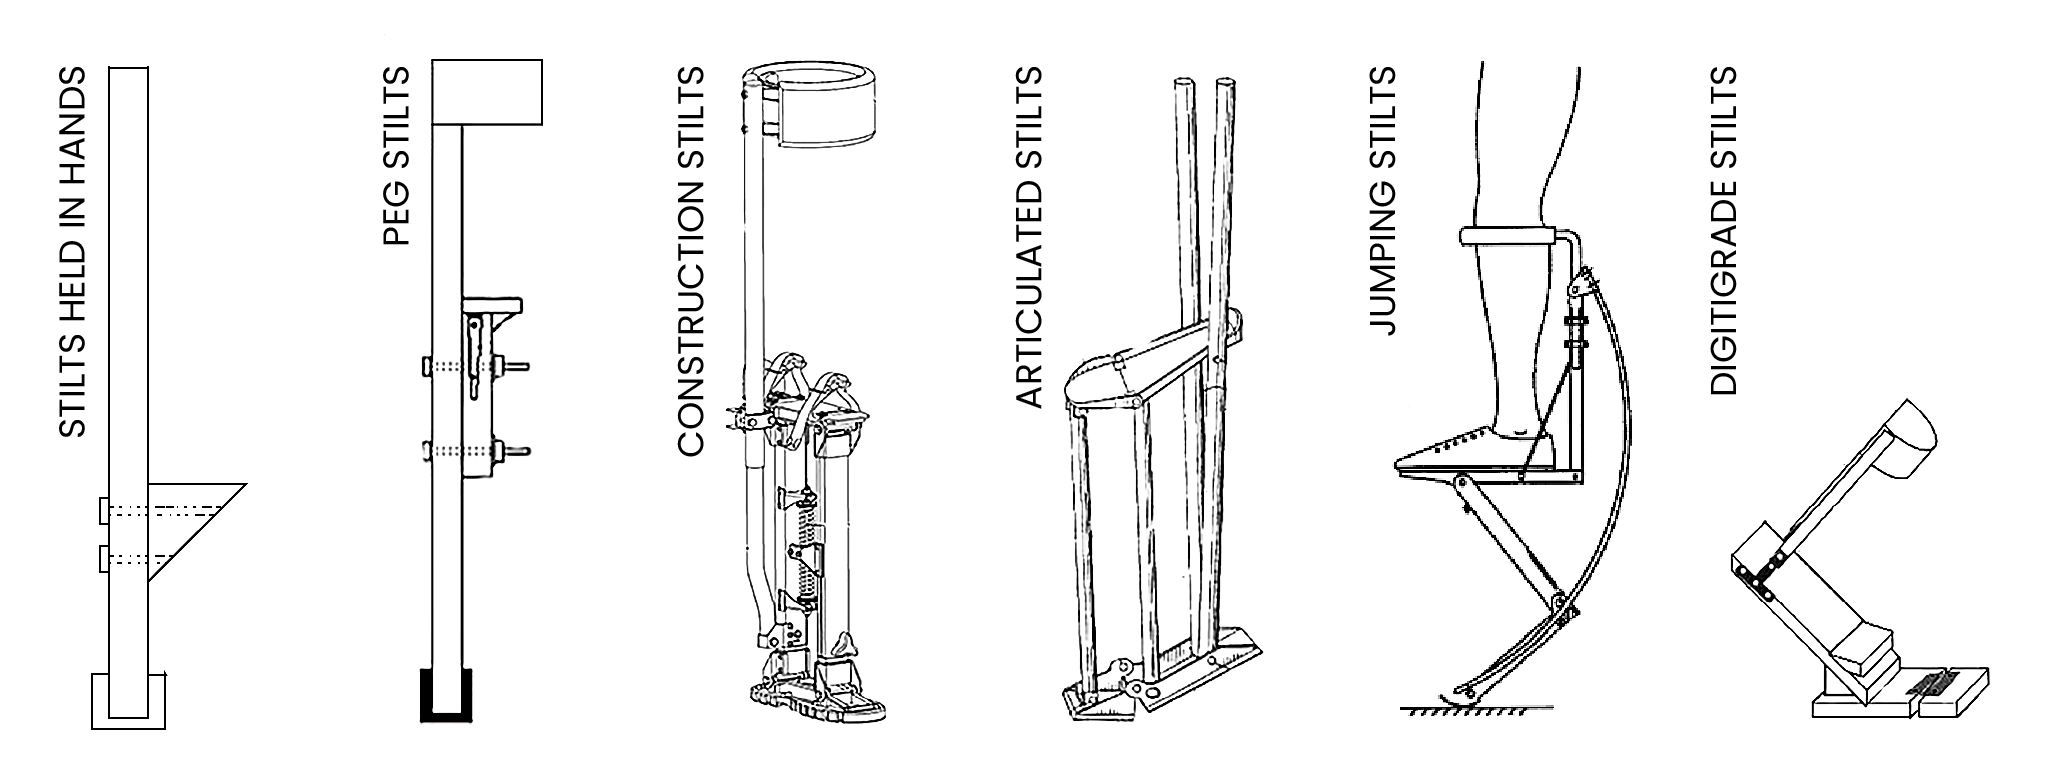
- STILTS HELD IN HANDS
- They consist of two long poles to which a foot support is attached. Walking on them requires a lot of hand-foot coordination, because when lifting the foot, we must simultaneously lift the stilt with our hand so as not to lose the base from under the foot - it is not attached in any way.
- PEG STILTS
- Peg stilts, also known as Chinese stilts, are commonly used by professional contractors. These stilts are attached at the foot, ankle, and just below the knee. Peg stilts are often made of wood, but can also be made of aluminum or steel tubing.
- Construction stilts
- Construction stilts were created relatively recently compared to their predecessors. They are most similar to articulated stilts in that they allow you to stand still. They are much heavier than pegged stilts and less versatile. Their primary purpose is stability, which is to enable work at heights.
- ARTICULATED STILTS
- These stilts allow the user to stand in one place without having to shift weight from one foot to another, which is their greatest advantage. Articulated stilts have a movable joint under the ball of the foot and, in one variant, under the heel. They were commonly used in amusement parks such as Walt Disney World and Universal Studios.
- JUMPING STILTS
- They allow the user to run, jump, and perform various acrobatics. All this is achieved by using fiberglass leaf springs. However, they are not suitable for any other type of movement.
- DIGITIGRADE STILTS
- Peg stilts, the line of which follows the foot, not the shin. This allows the user to imitate the gait of an animal. Due to the extreme loads of this type of construction, they are rarer, there are much fewer successful designs. Most often used for make-up, costumes created for various purposes.
Construction of a peg stilt

- 1. Knee protector
- The knee protector consists of an outer and inner part. The outer part is designed to protect the knee in the event of a fall and is one of the attachment points of the crutch to the leg. The inner part isolates the knee from the hard outer part.
- 2. Foot base
- The element on which the foot is placed directly. The place where there are most points of attachment of the leg to the stilt.
- 3. Foot Support
- The foot support distributes the body weight from the foot to the stilt.
- 4. Pole
- The pole is the main element of the stilt, to which the rest of the elements are attached. It is usually about 95 cm - 1 m high.
- 5. Instep
- The instep is designed to provide cushioning during movement, and provides an anti-slip function. Most often made of various types of rubber.
MATERIALS
/pole
This element is made in most cases from wood or aluminum. Its length is the height at which we want to be, plus the length from the foot to the knee. So these are two elements for a length of about 1.4 m, assuming that we want to walk at a height of 1 m. Stilts made of aluminum are relatively light. The structure is empty inside, so we do not carry unnecessary weight with us, but the material is hard, so it transfers vibrations associated with each impact of the stilt on the floor to the body. Stilts made of wood have much better properties in terms of vibration damping than those made of aluminum. The problem with poles made of wood is their weight. They are elements filled inside, due to their lower strength.
/Knee protector
Knee protector is divided into two parts – external and internal.
The external part is to protect the knee from impact, when falling from a great height. It is most often made of wood. It is not adjusted to the knee in any way, it is a simple, thick board.
The internal part is to isolate the knee from the hard external part. It is made of sponge. Sponge in this sense is everything that a person has access to at the moment and fulfills its role (to a greater or lesser extent). The main problem with using sponges is their wear and tear and assembly. They are most often glued with tape, which our skin later comes into contact with. They are to create a shape between a flat surface and our knee.
/foot base
This part, like the outer part of the protector, is made primarily of wood. While the material itself is not too much of a problem at this point, you can consider how to use its full potential and include functional elements, such as adjustment. This element is often not adjusted to the user and the length of the foot they have, resulting in an unnatural angle of the shin in relation to the foot and a much greater risk of injury.
/instep
This is an essential element for safe walking on stilts. It provides insulation between the pole and the ground on which we walk, so it protects it from damage. It dampens impacts, but also provides an anti-slip function. All kinds of rubber are used for this purpose. The biggest problem with this part is replacing the padding when it wears out. It is often a rectangle screwed on two sides, creating a „U” shape at the end of the pole, which can cause it to slip. Sometimes the rubber is glued with tape or mounted on clamps.
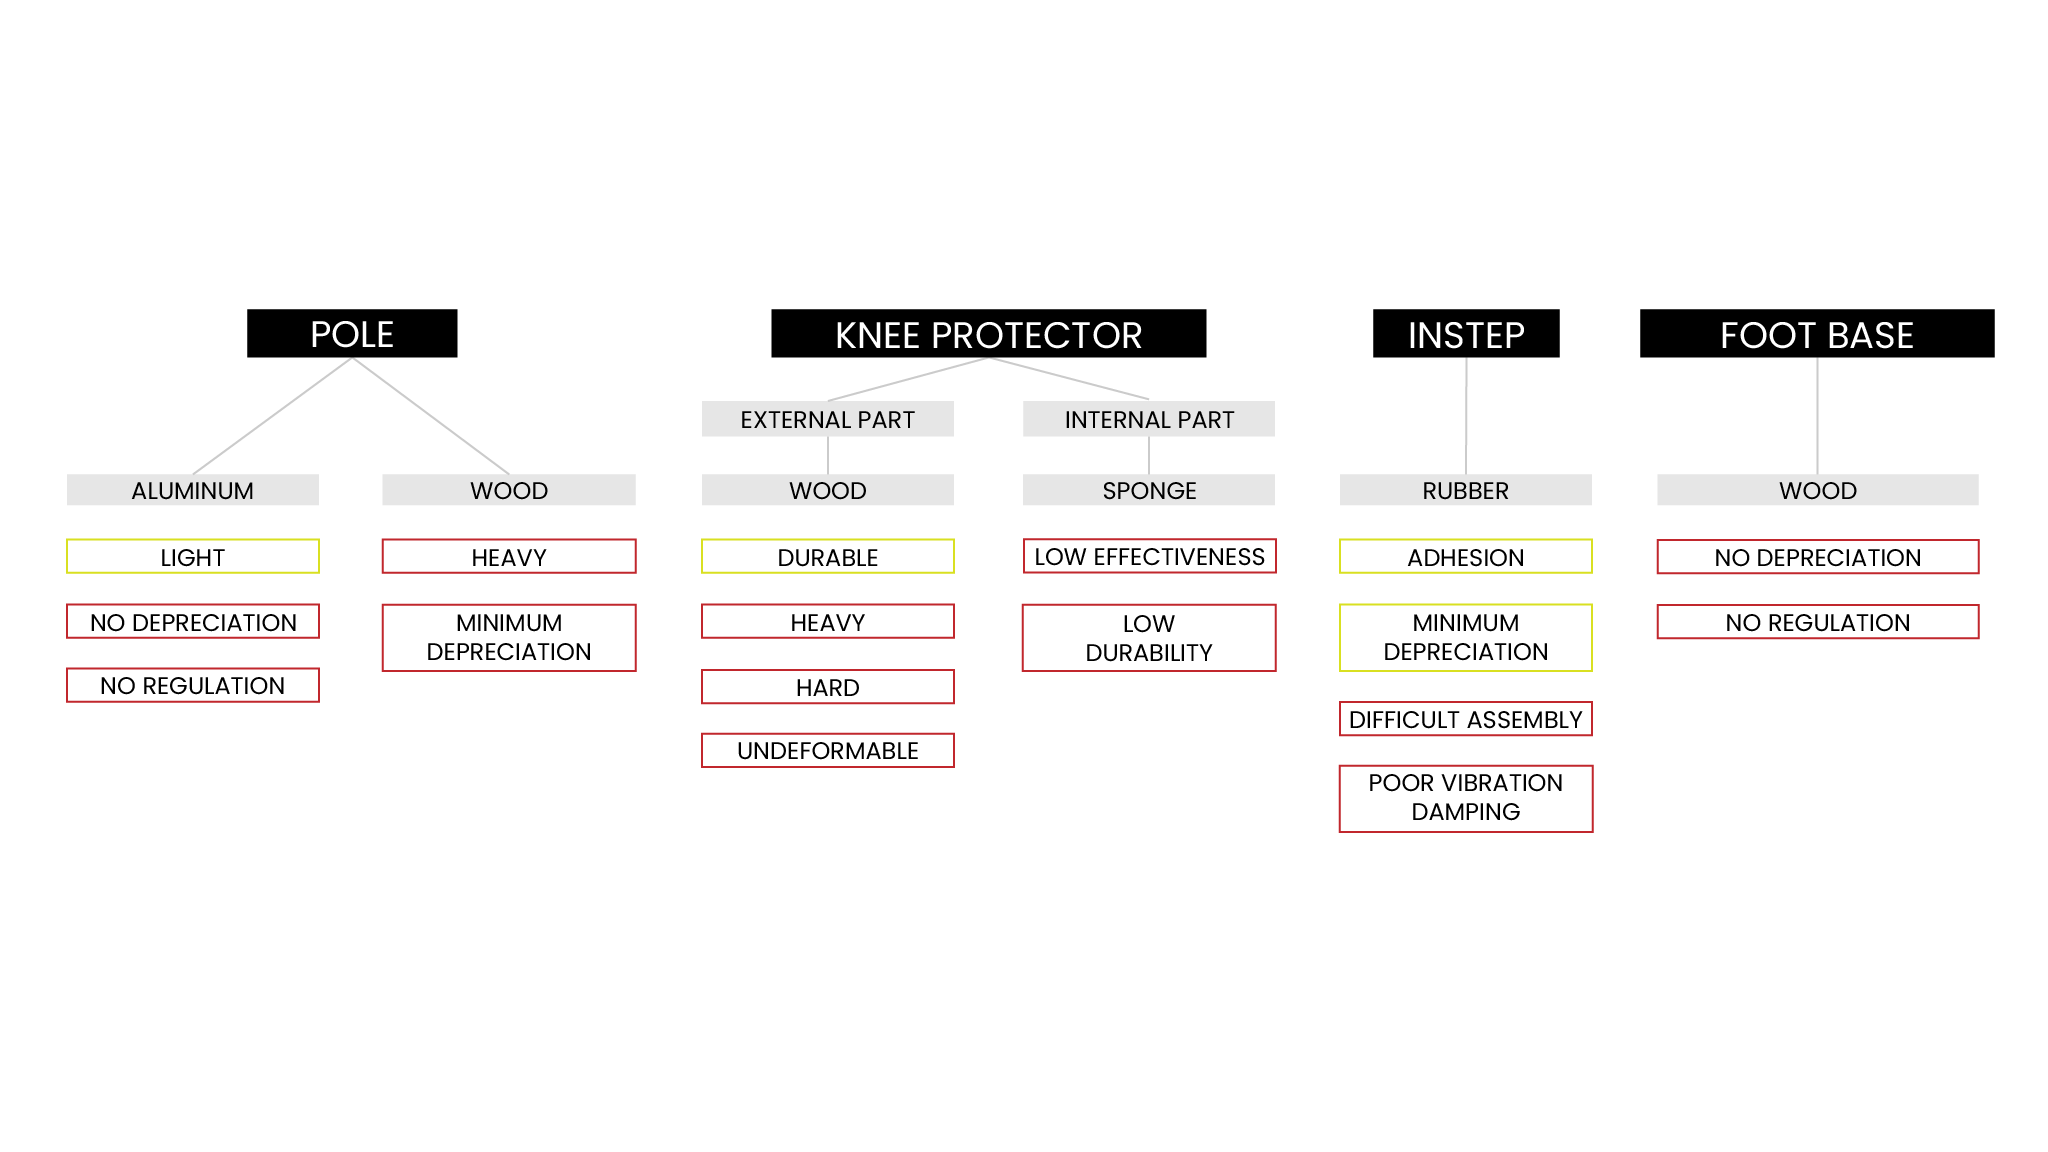
Problems
The problem statement is a summary of previously collected information. It gathers conclusions from all the information presented up to this point. They are an introduction to the search for solutions in order to create a product that responds to the existing needs.

SOLUTIONS FOR RELATED INDUSTRIES
There aren’t many stilts on the market, but if we take a closer look at them and focus on the individual elements of their construction, we will see that there are items that are designed to solve a similar problem.
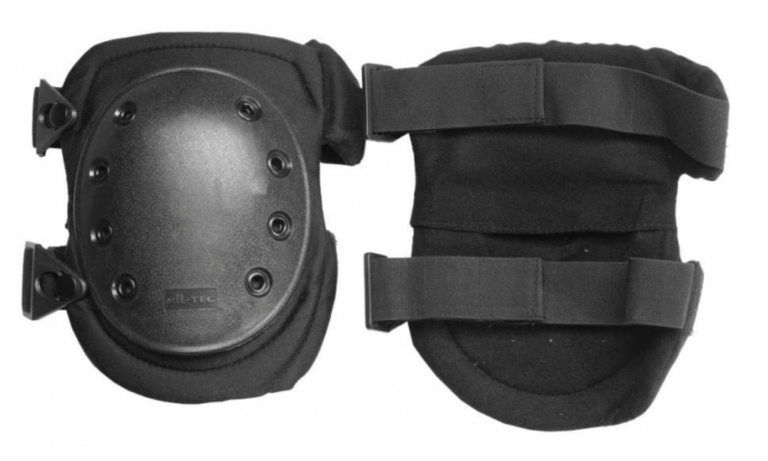
knee
The upper part of the stilt, designed to protect the knee, resembles a protector used for various types of sports. Protectors usually have a streamlined form made of hard material, shaped to fit the knee, and soft filling in the middle. The fastening comes down to an elastic band put on the leg, to which hard elements are attached, or they are fastened with Velcro straps so that the strap is not on the knee bend.
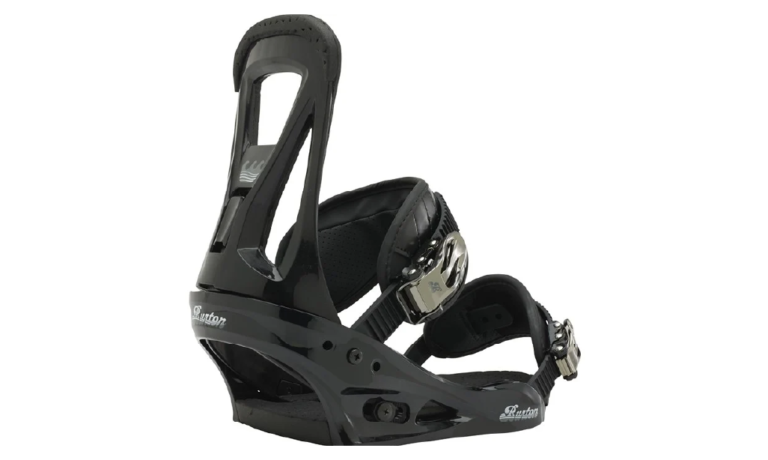
Bindings
Bindings are a piece of snowboarding equipment that is designed to hold boots attached to a snowboard in a specific position. This is a very well-designed element that involves adjustment and adjustment to the user, which is missing in stilts. Figure 6.2 shows the construction of a snowboard binding. The elements worth focusing on are the straps, which allow for quick and efficient assembly of the boot. Thanks to the pumps placed on them, we can adjust the fastening. The heel and the highback in some models also have the option of adjustment by rotation.
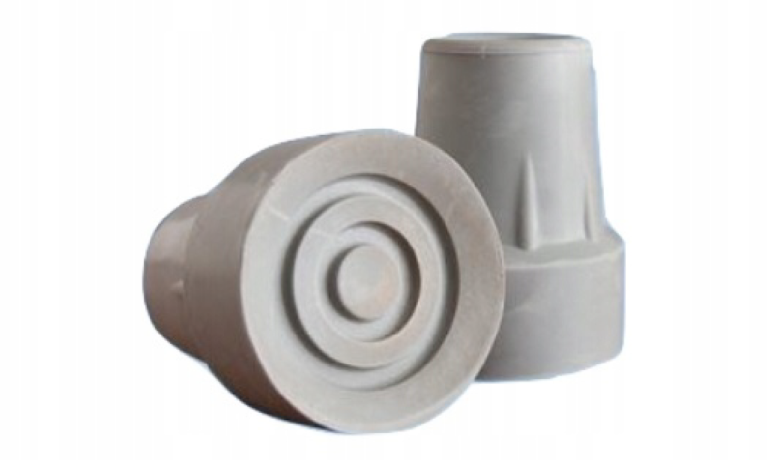
instep
Orthopedic crutches are very similar in structure to stilts. The main difference is that instead of standing on them, we support our body weight with our hands. The element worth focusing on in this solution is the rubber mounted at the end of the crutch. They are mounted by pressing, so they can be freely replaced. The diameters of the overlays reach up to about 20 mm, which is quite a small range, but on the market we also have overlays for furniture, walkers or walking sticks that work in the same way, but their sizes are larger.
Design assumptions
All the information collected and the design problems summarizing them lead to the creation of design assumptions that the designed product should meet. They are described below in the form of functional, technological and ideological assumptions.
FUNCTIONAL ASSUMPTIONS
– knee protection
– good lightness to stiffness ratio of the material
– providing cushioning and anti-slip properties at the base
– breathable materials that are in direct contact with the skin
– modularity and easily replaceable parts
– strong fasteners that do not hinder walking, allowing quick assembly
– parts that require adjustment with the possibility of adjustment
TECHNOLOGICAL ASSUMPTIONS
– solutions that are as economical as possible, not requiring very complicated and expensive technological processes
– selection of materials that best match the functional assumptions in terms of their properties
IDEOLOGICAL ASSUMPTIONS
Stilts, once often used, are becoming less and less common. They are an interesting part of our history, not only in entertainment, but also in everyday life. The idea of the project is to renew the invention and remind that it can be very useful. The goal is also to create equipment that will allow the development of stilt walking and make it easily accessible to anyone who wants to start their adventure with it. For professional stilt walkers, the project is to provide support in their work.
design process design process
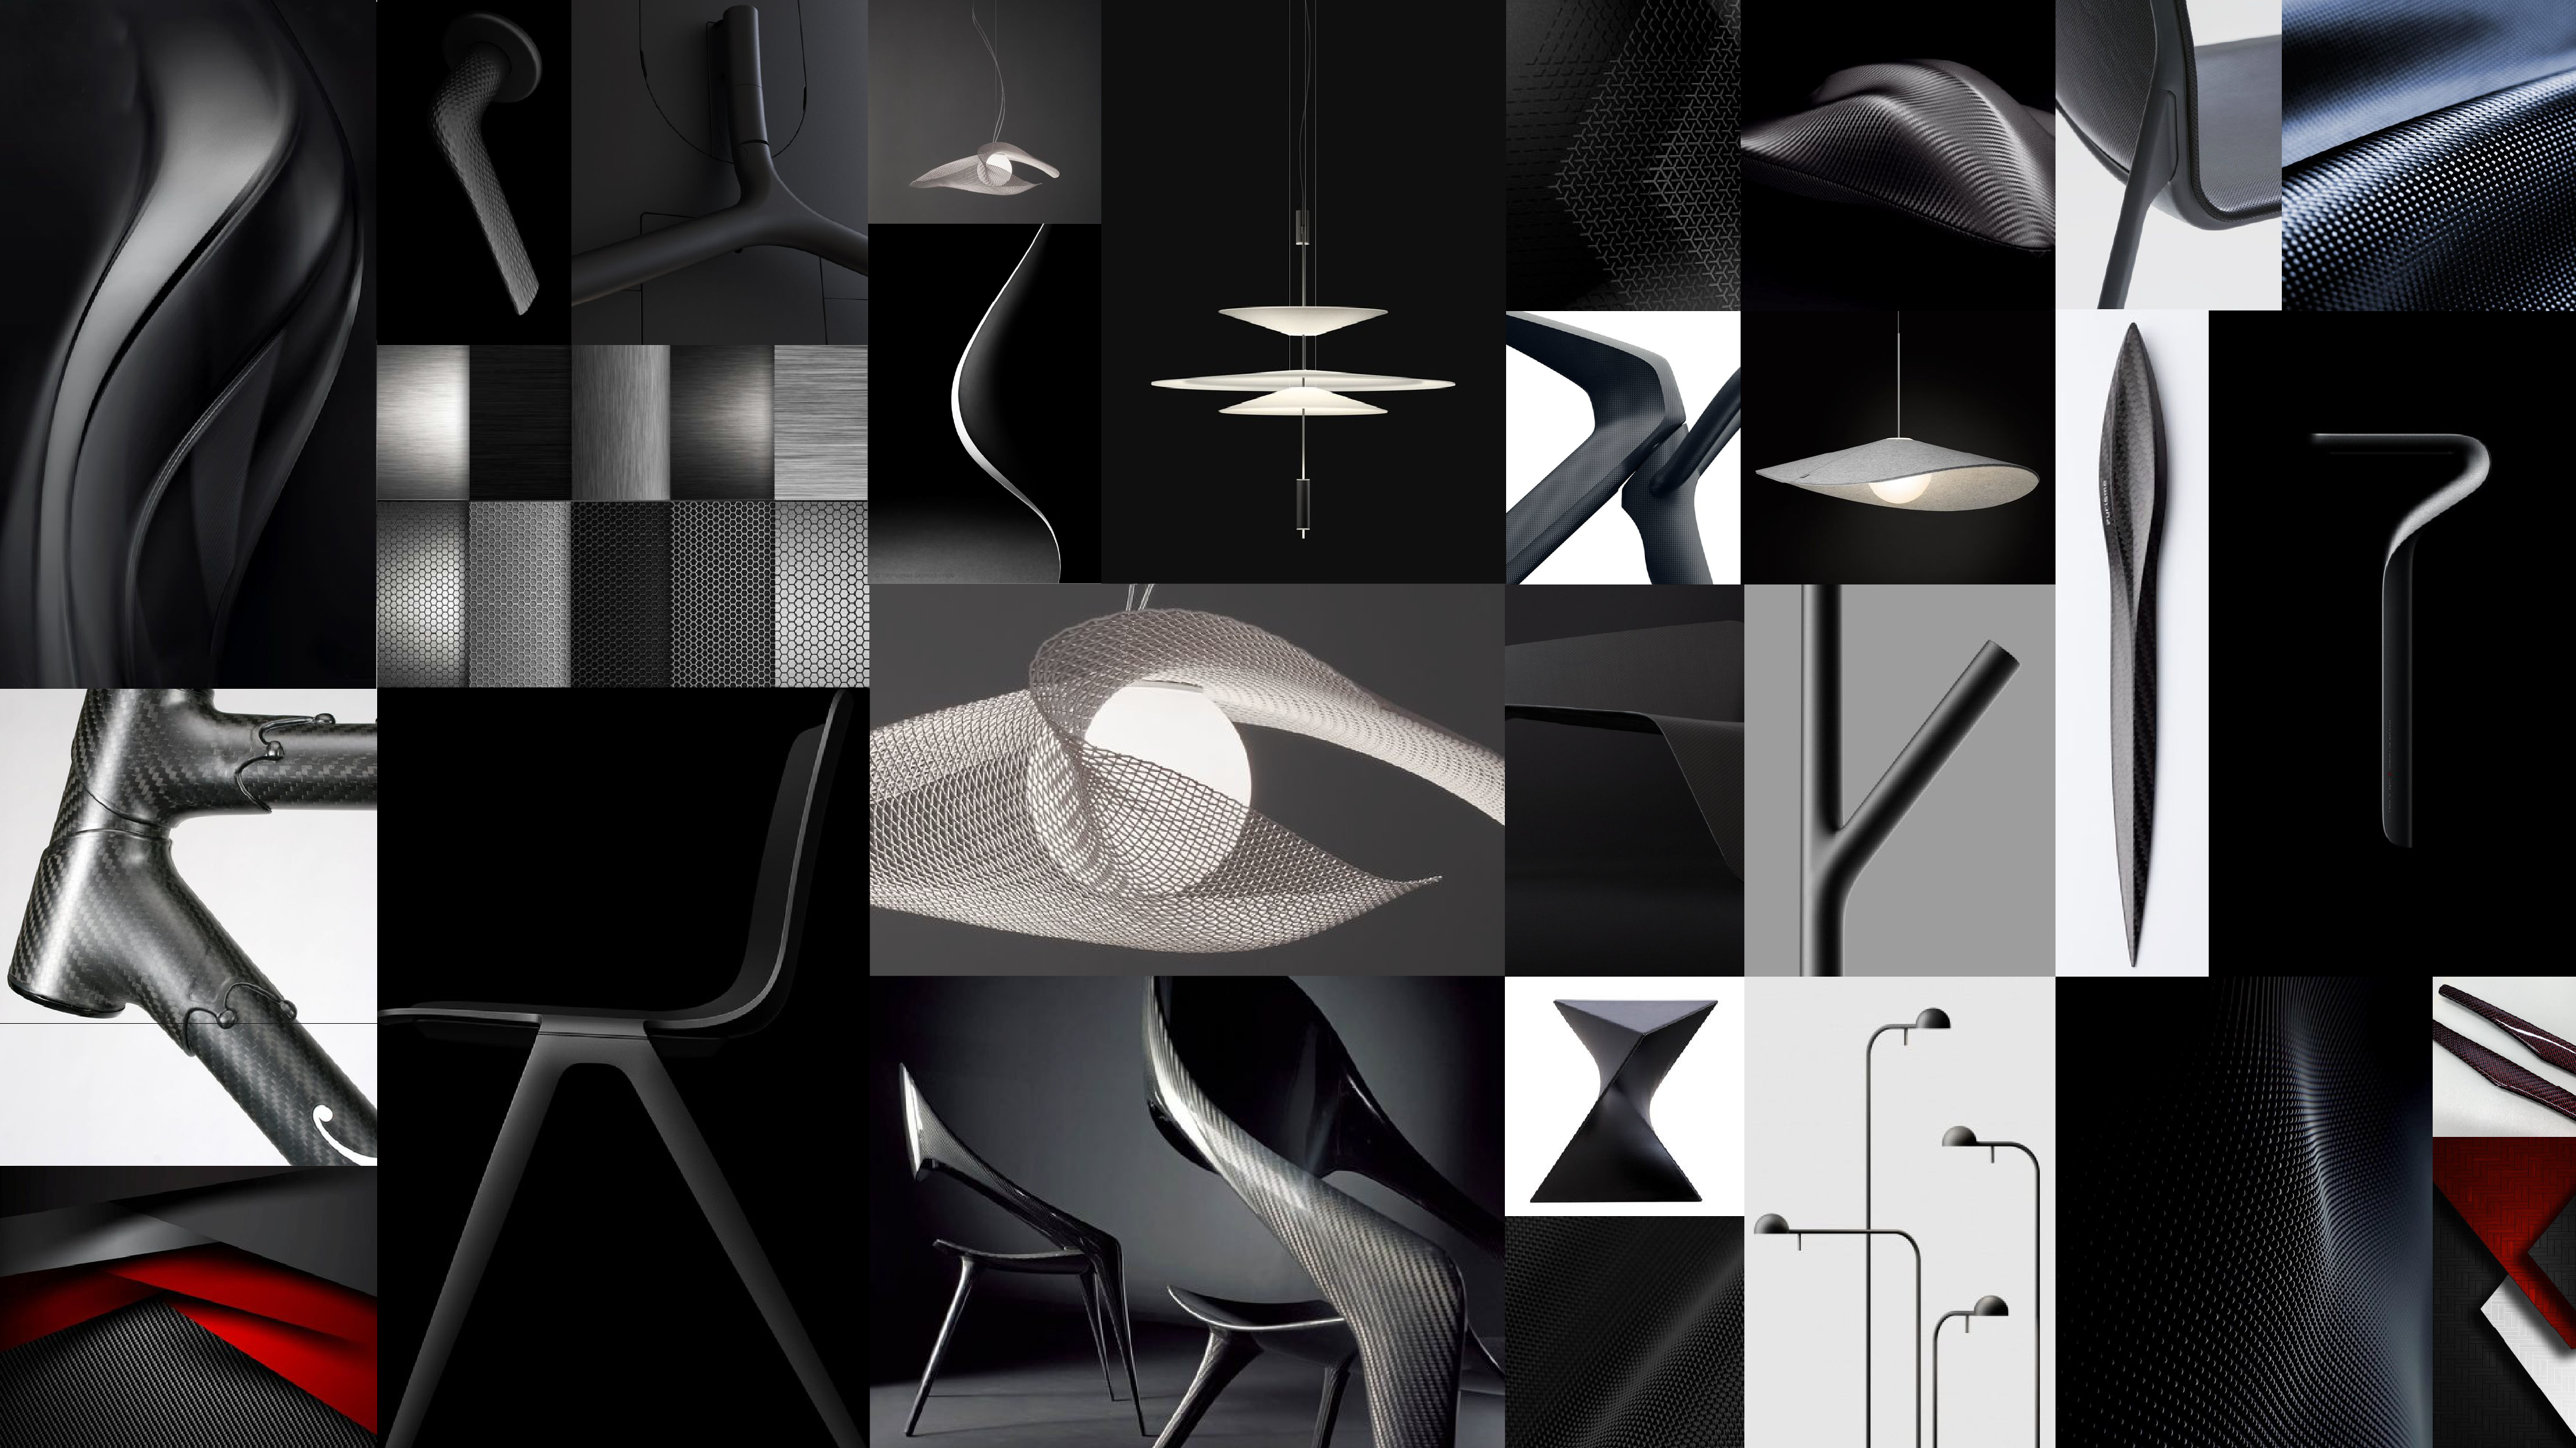
MOODBOARD
CONCEPT SKETCHES
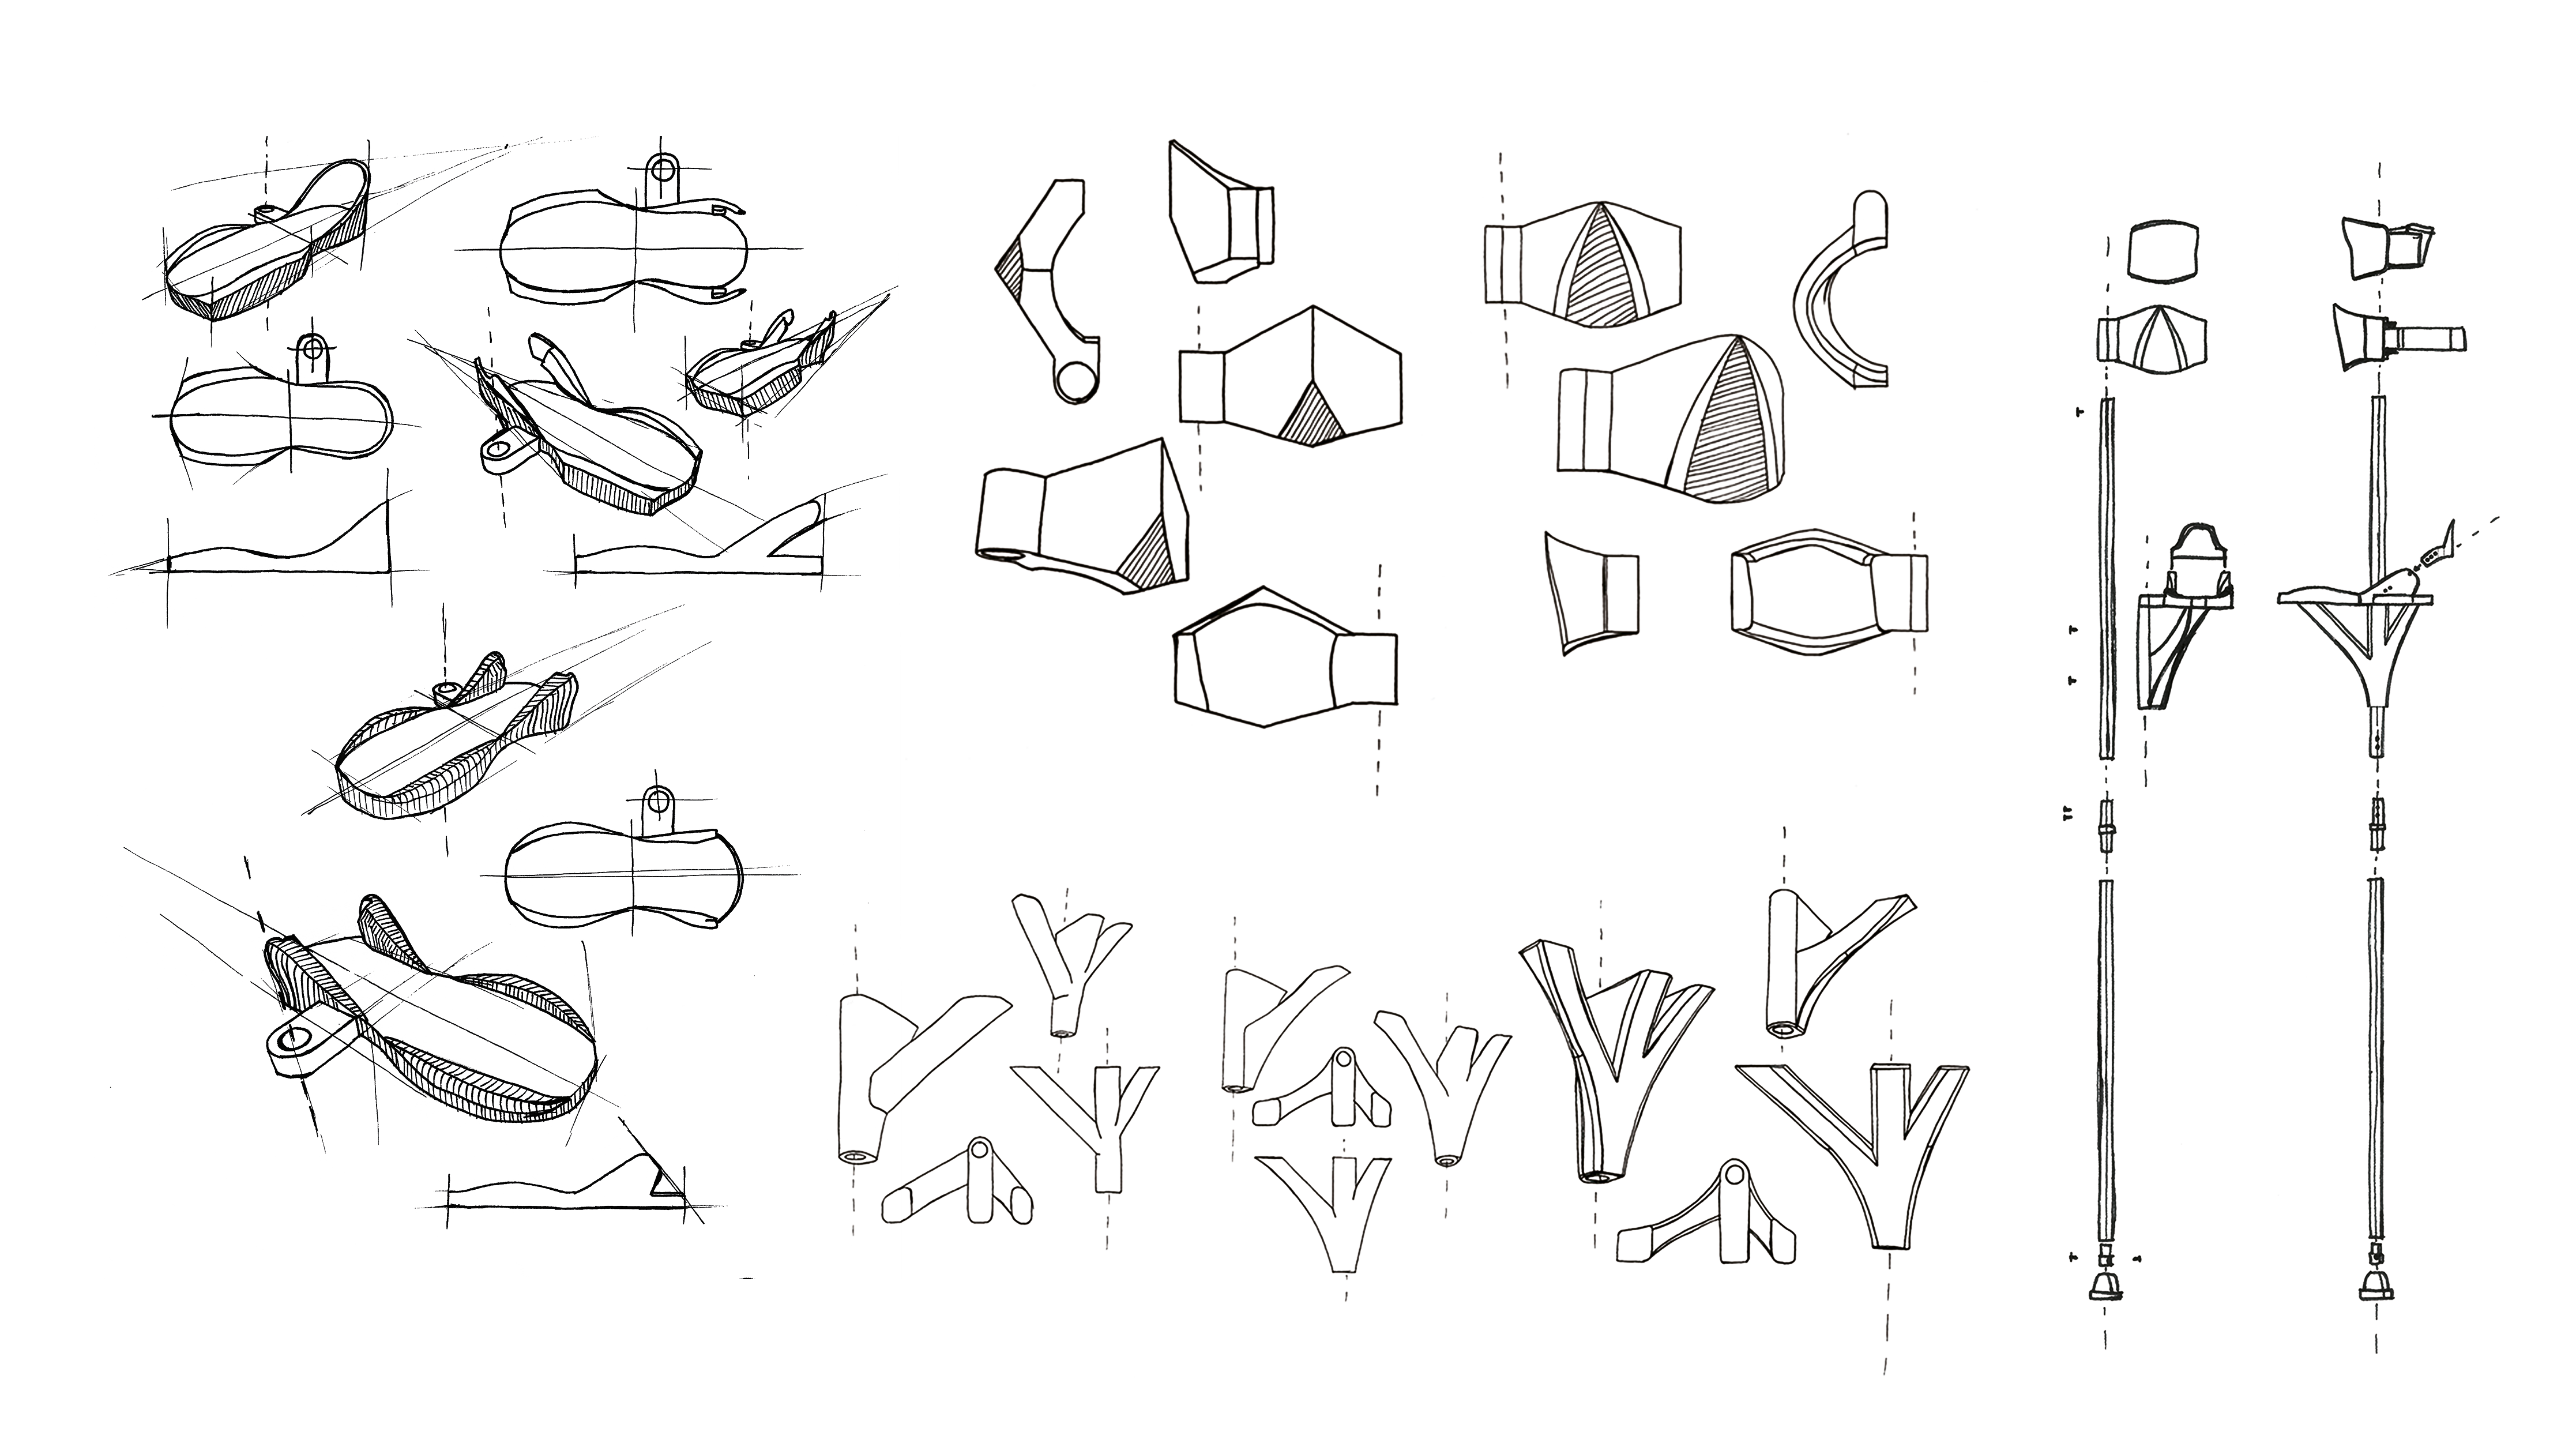
In order to find the right concept that would meet the design assumptions, conceptual sketches were created. They are an attempt to find a balance between the functions they should contain and the aesthetics of the entire project. Each part was considered separately to focus maximum attention on it, connecting the whole with a common style and character.
OPTICAL COORDINATE MEASUREMENTS
/scan of elements
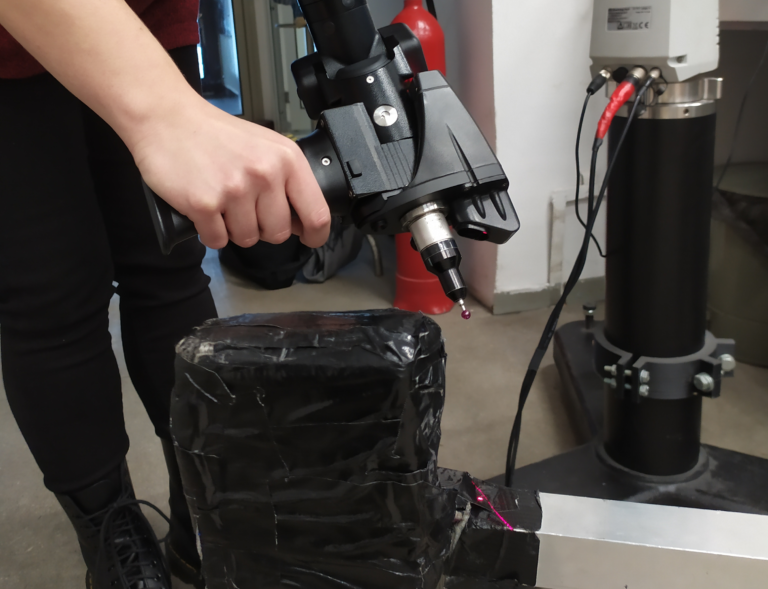
In order to design the most ergonomic stilts possible, it was decided to use coordinate optical measurements in the design process. The stilt and the leg were scanned. In the further process, the leg scan was primarily used. The scan was performed using a measuring arm from ROMER, model RA – 7320 SI.

/working with a grid of points
Once the point cloud was obtained, the file was saved and exported to Geomagic Design X, where further processing of the file took place. The aim was to obtain the knee surface, to which the protector was then added, and to obtain the surface of the shoe sole, to create a support for the foot. The scans were necessary to obtain the correct lengths, such as the distance between the pole and the footrest attachment, so that the leg angle would be correct.
3d modeling
Below we can see the individual stages of the modeling process of the final elements.
Final concept
stilt elements
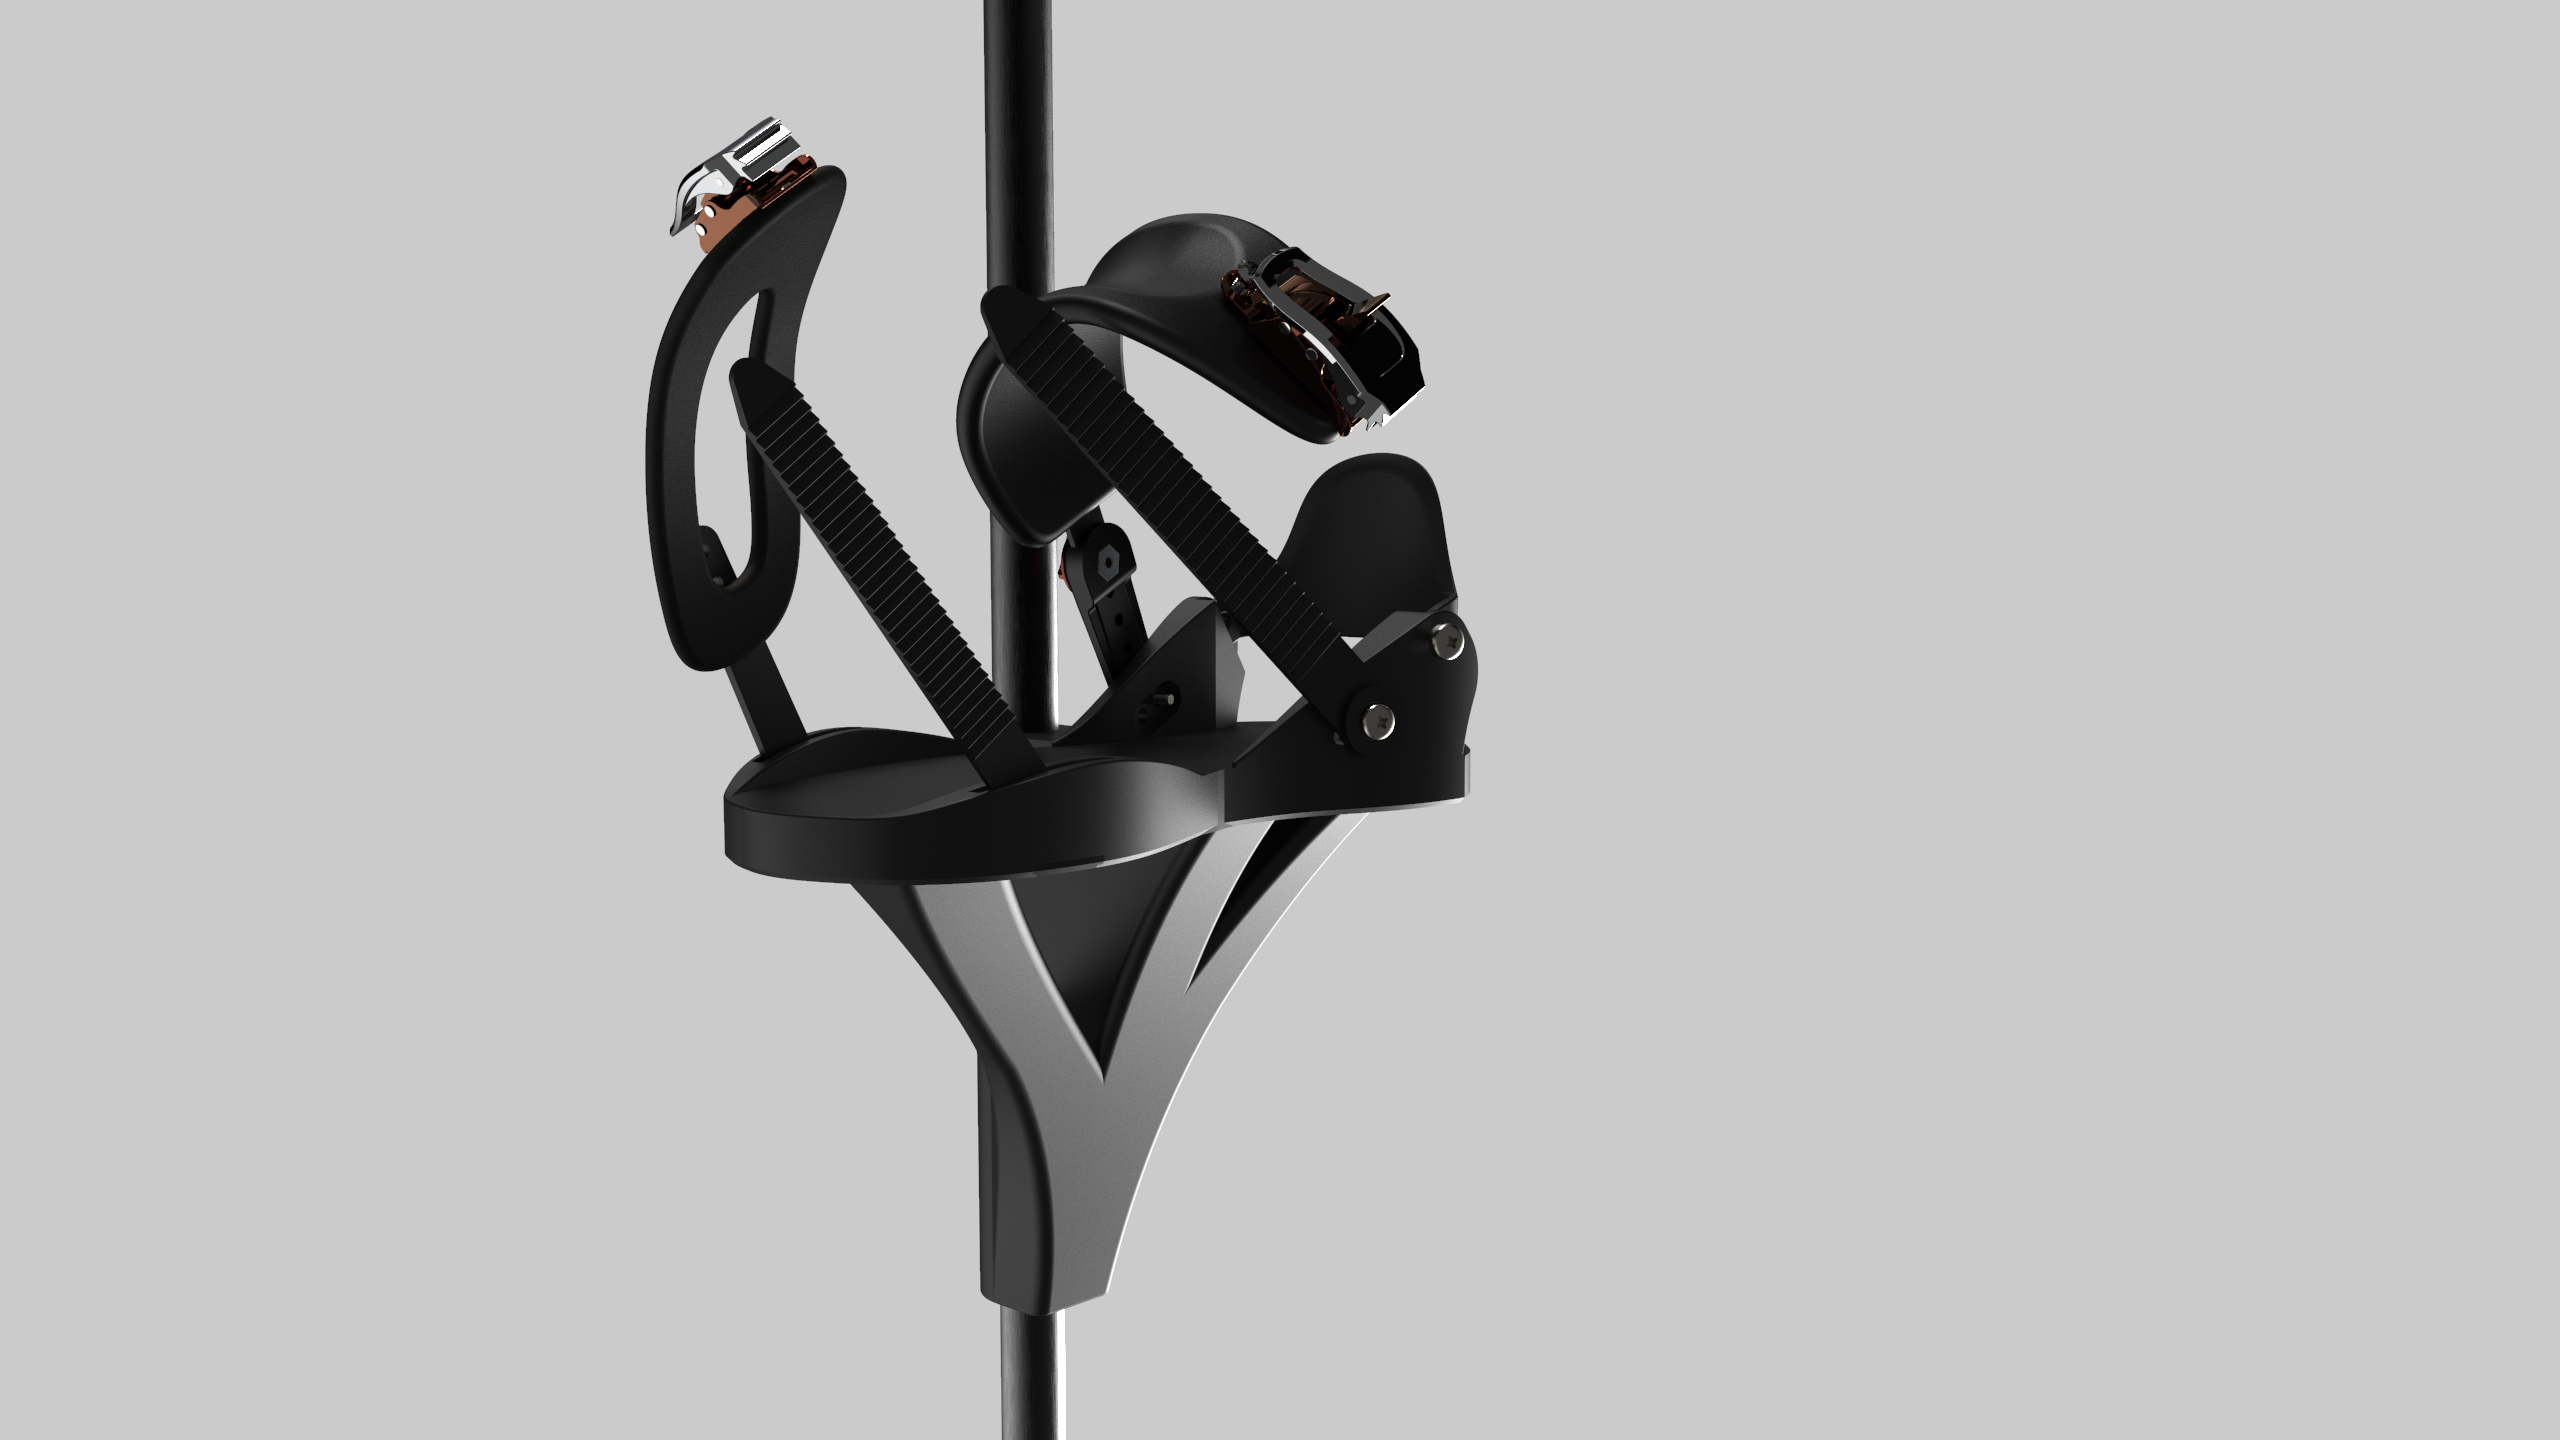
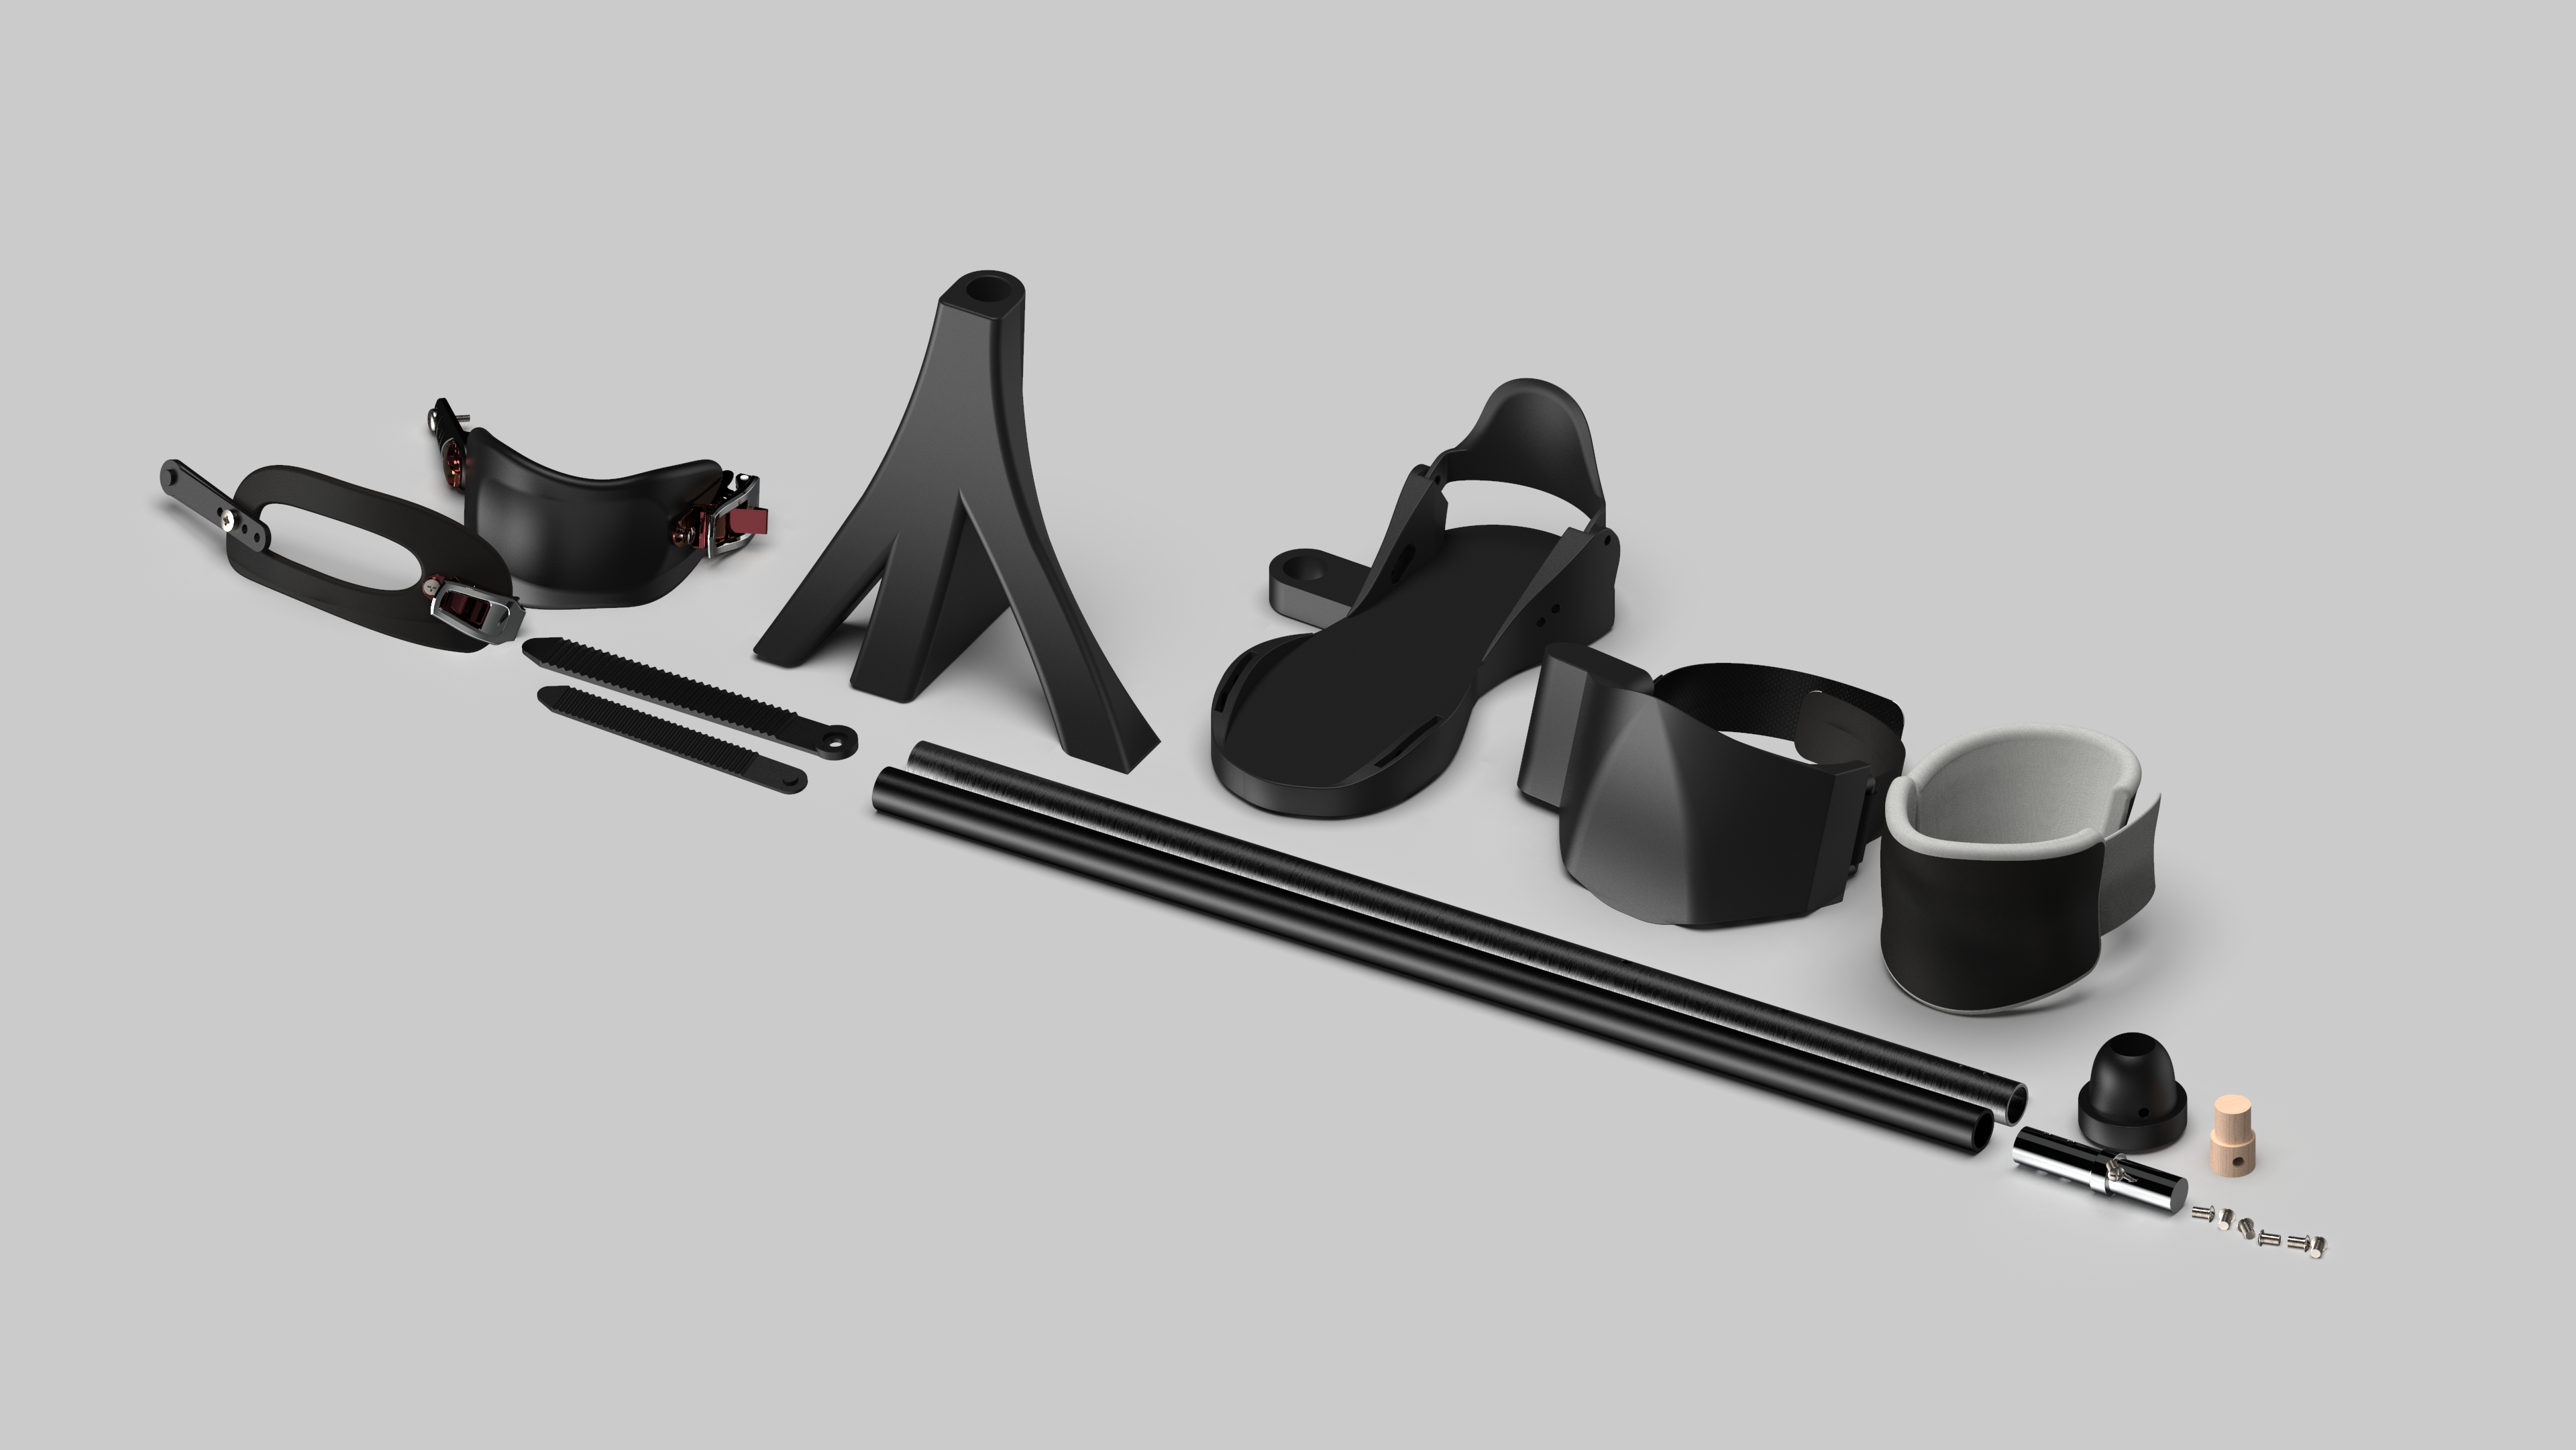
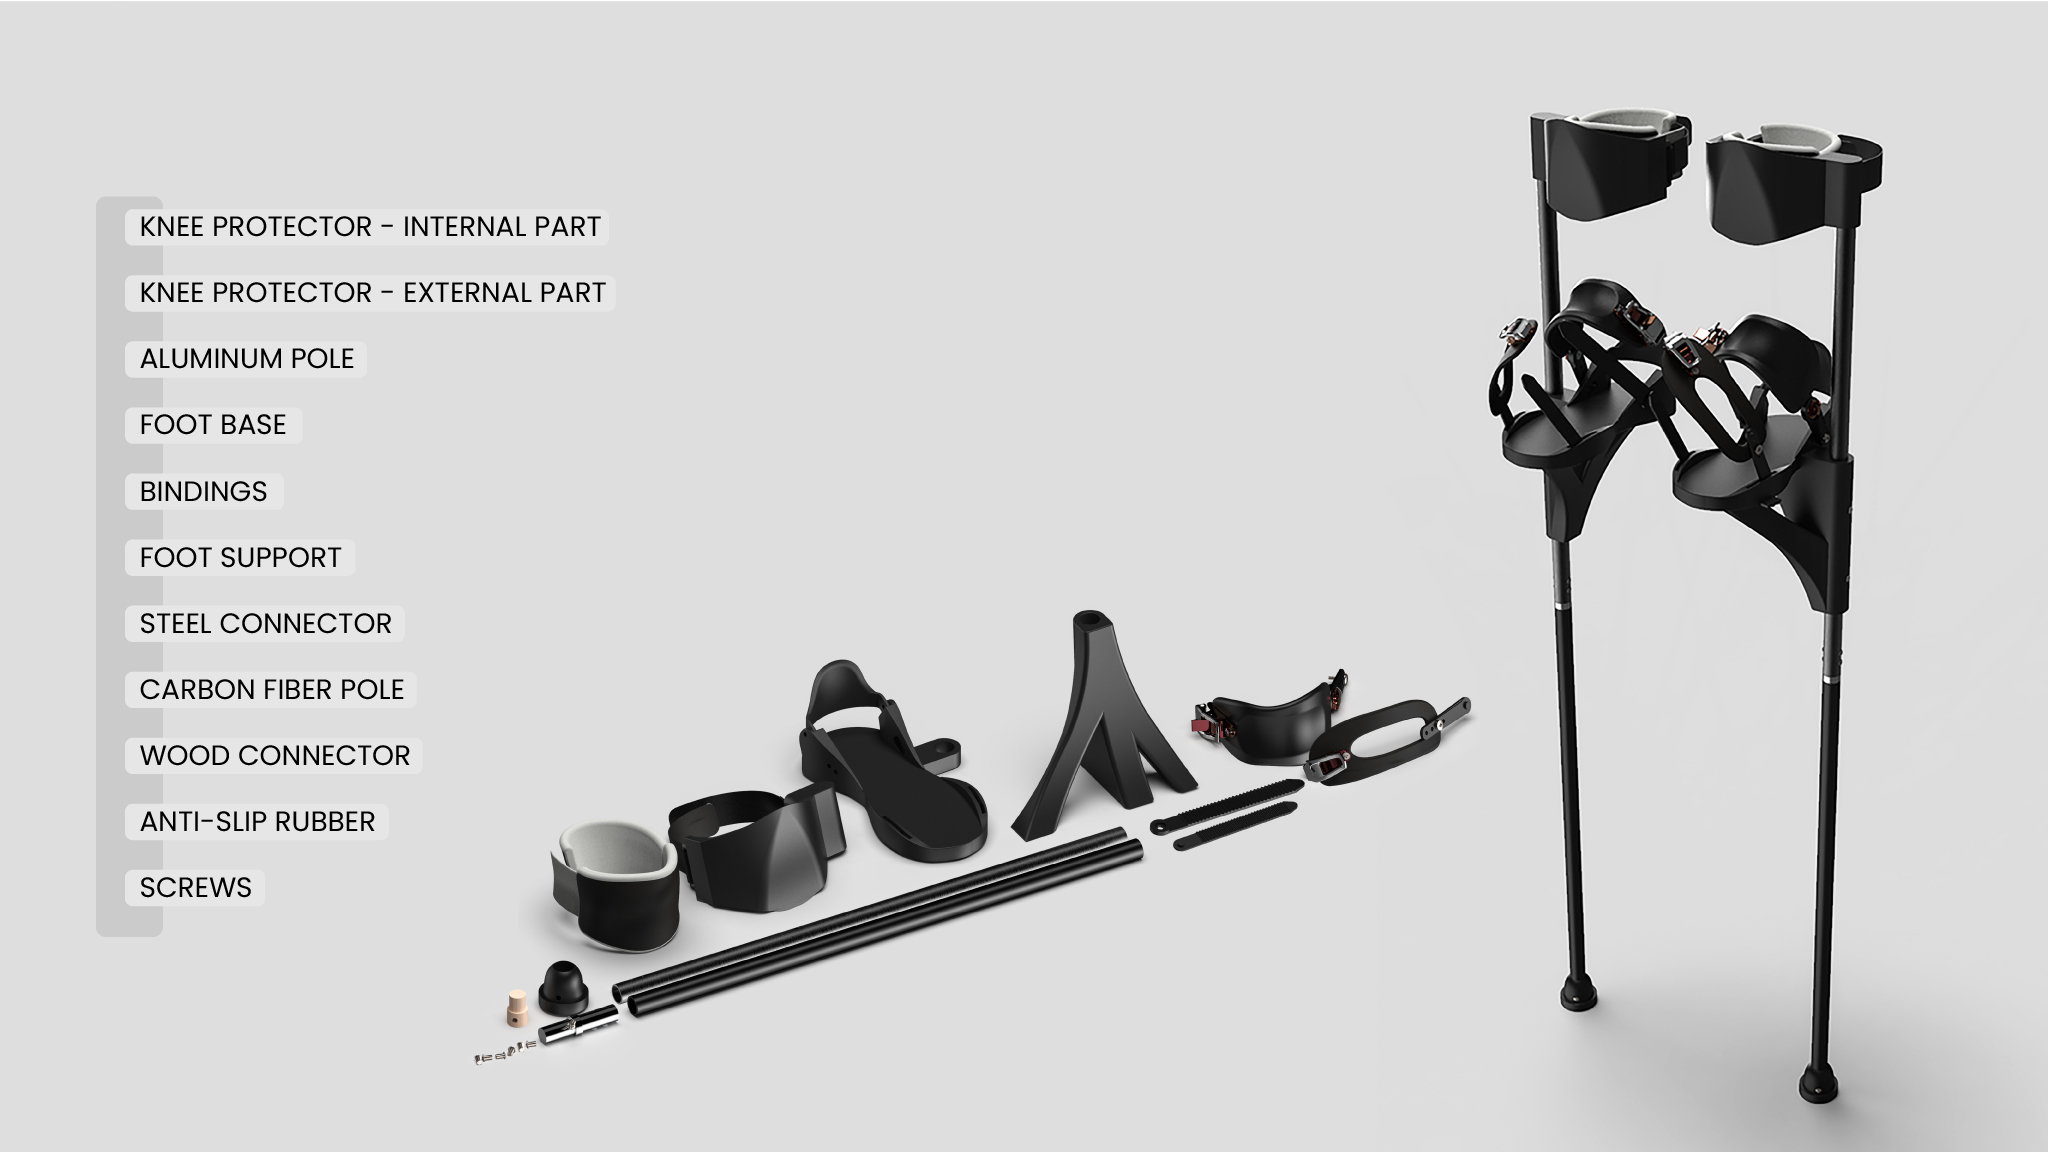
The design of the stilt concept and its construction was created in parallel with the concept of the materials used to create the product. This process was important because the materials, or more precisely their properties, can solve some of the design problems in this product. Below is an illustration showing all the elements of the stilt.
Knee protector
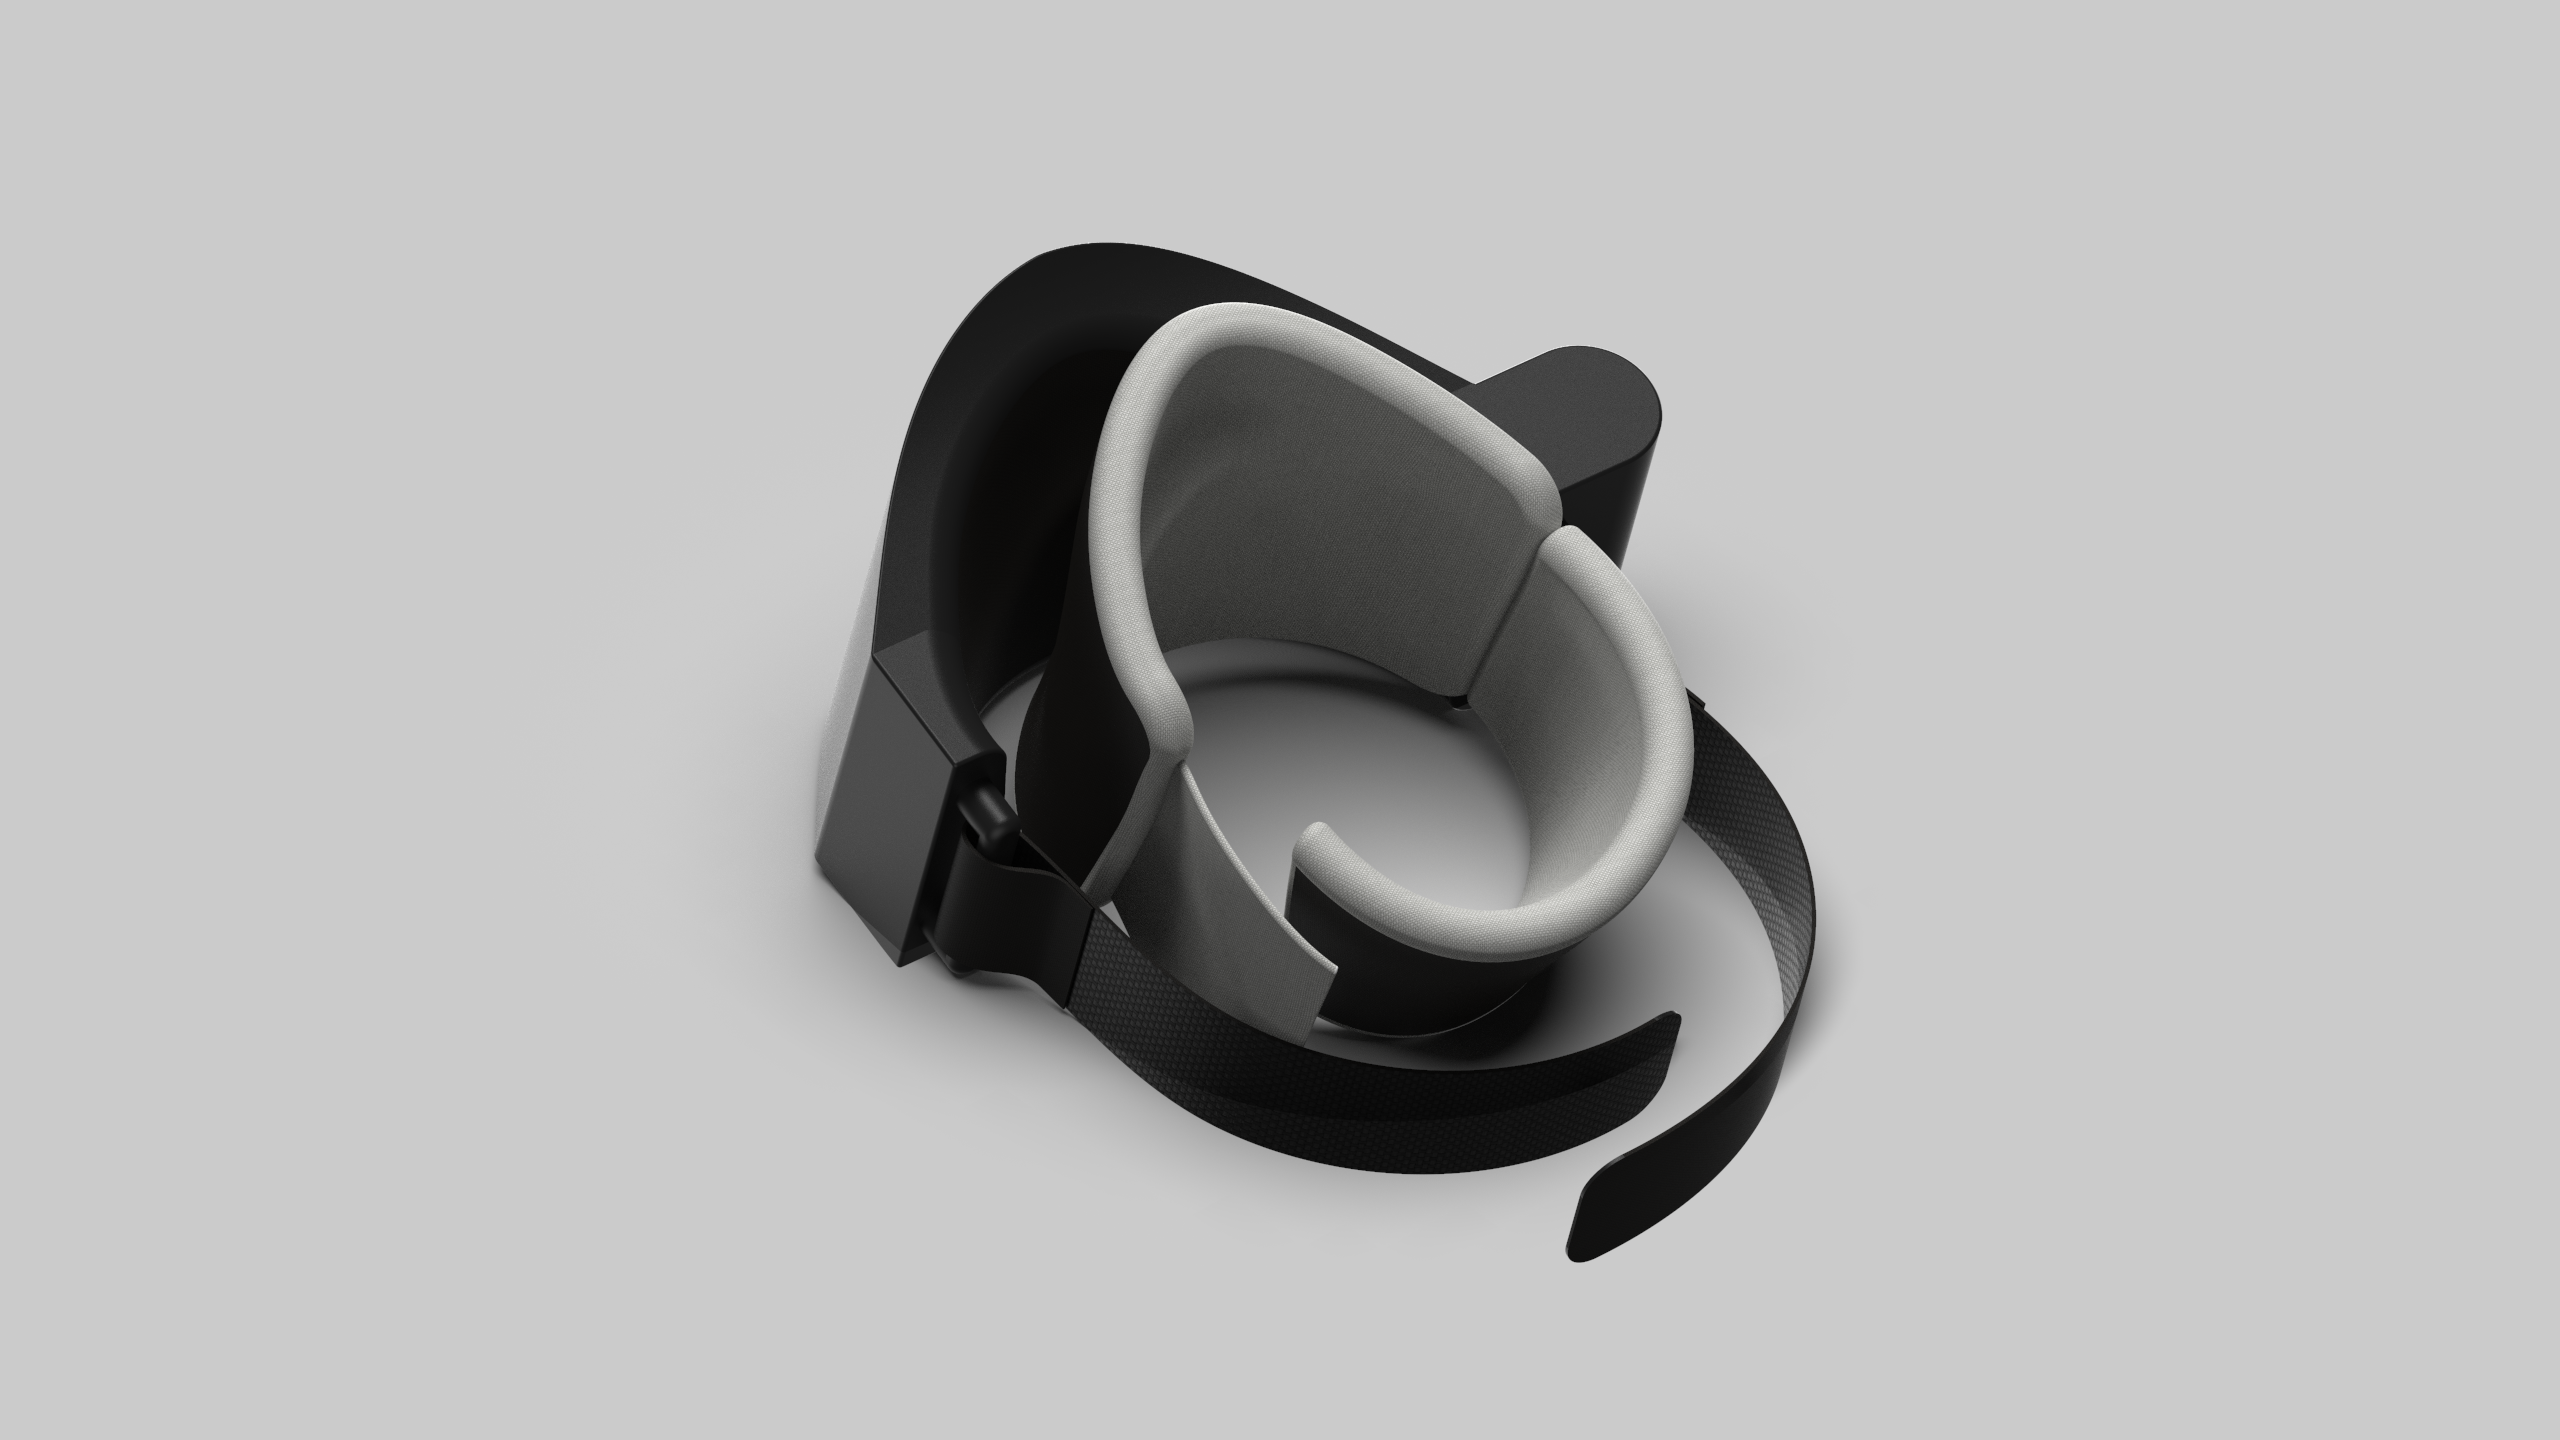
The knee protection consists of two parts – external and internal.
The task of the external part is to protect the knee in the event of a fall. The internal part is attached in such a way that the protector is comfortable and protects the knee from the hard external part. The external protector was designed using coordinate optical measurements to best match the shape that adheres to the leg. Since we assume the presence of the internal part, the surface that was obtained was enlarged 1.2 x, which gives us space for filling. The model is designed for 3D printing, which gives us the ability to personalize each order, thanks to the scaling of the element. Wide Velcro straps are attached to the protector, with which we attach the protector to the leg, just below the knee.
The internal part of the protector is made of polyurethane foam covered with fabric. Thanks to the use of polyurethane, the filling perfectly adapts to the leg during use, after which it returns to its original shape. The fabric provides comfort when in contact with the skin. The whole thing was attached to the outer protector with Velcro, so as not to generate a geometry that could potentially dig into the knee. Thanks to this, we can also easily remove the inner part and wash it. The inner part also includes a protective belt under the knee, so that the outer part’s Velcro does not hinder our walking and does not dig into the leg.

pole
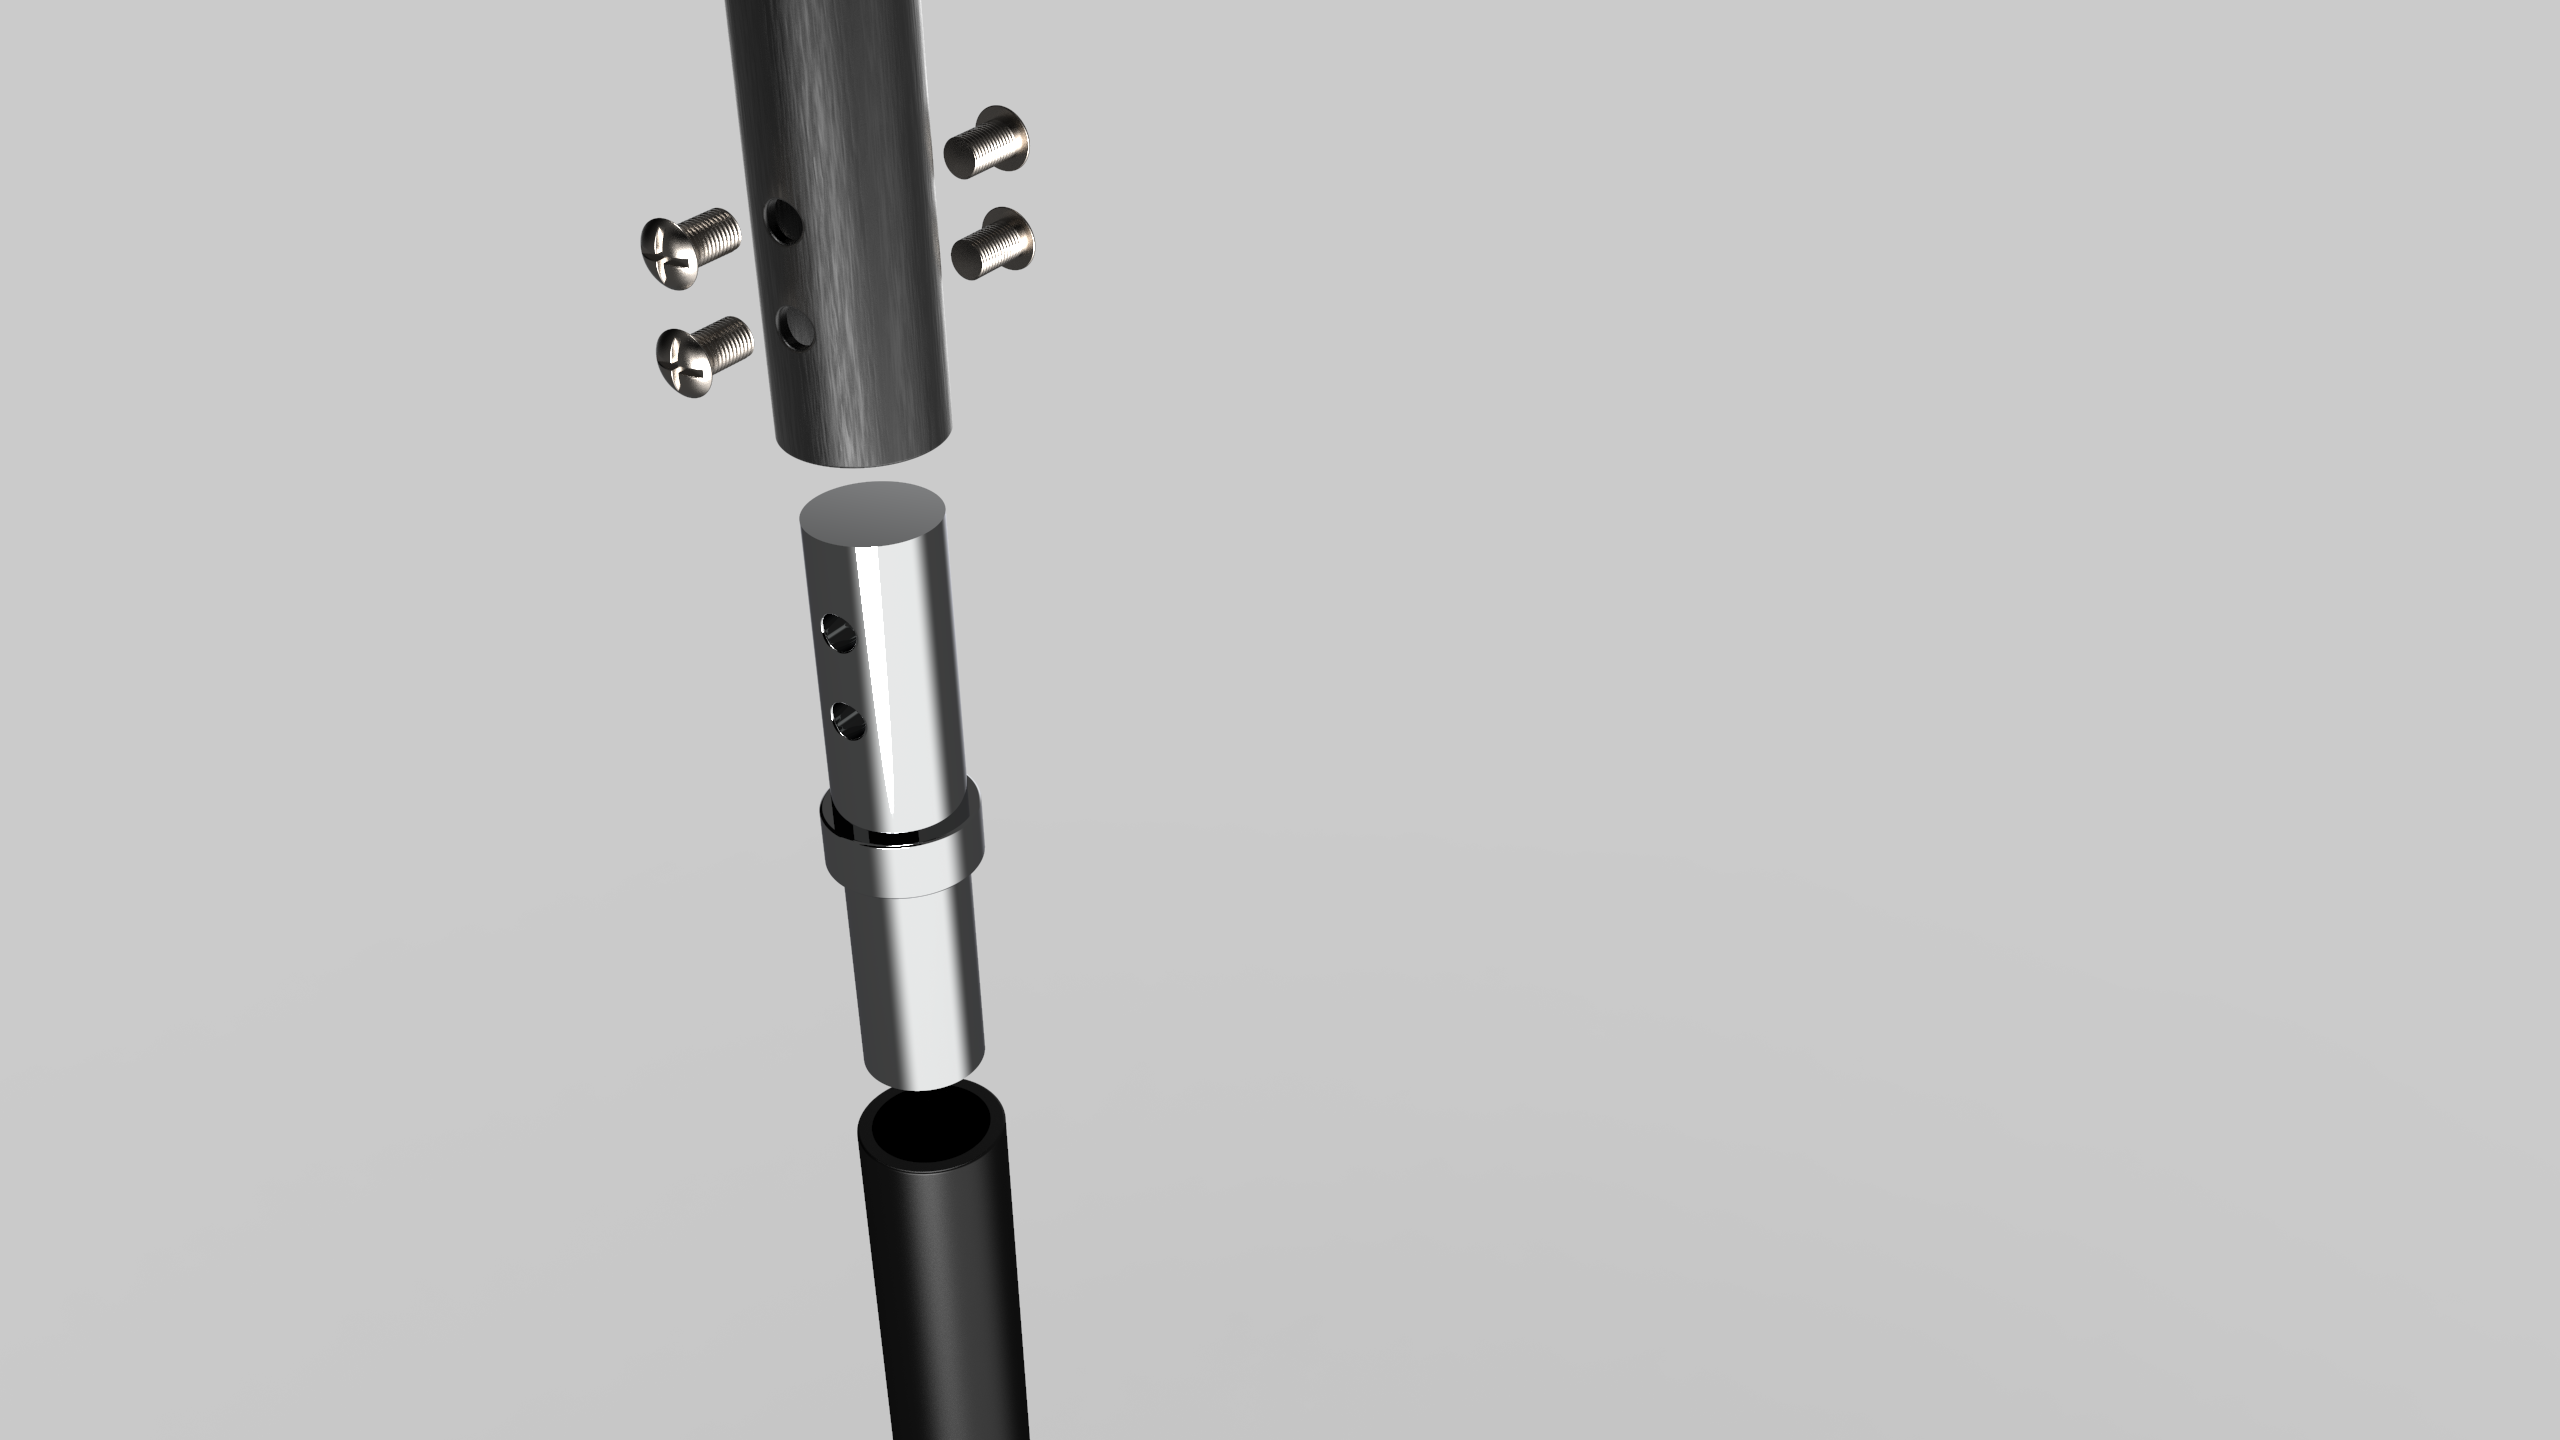
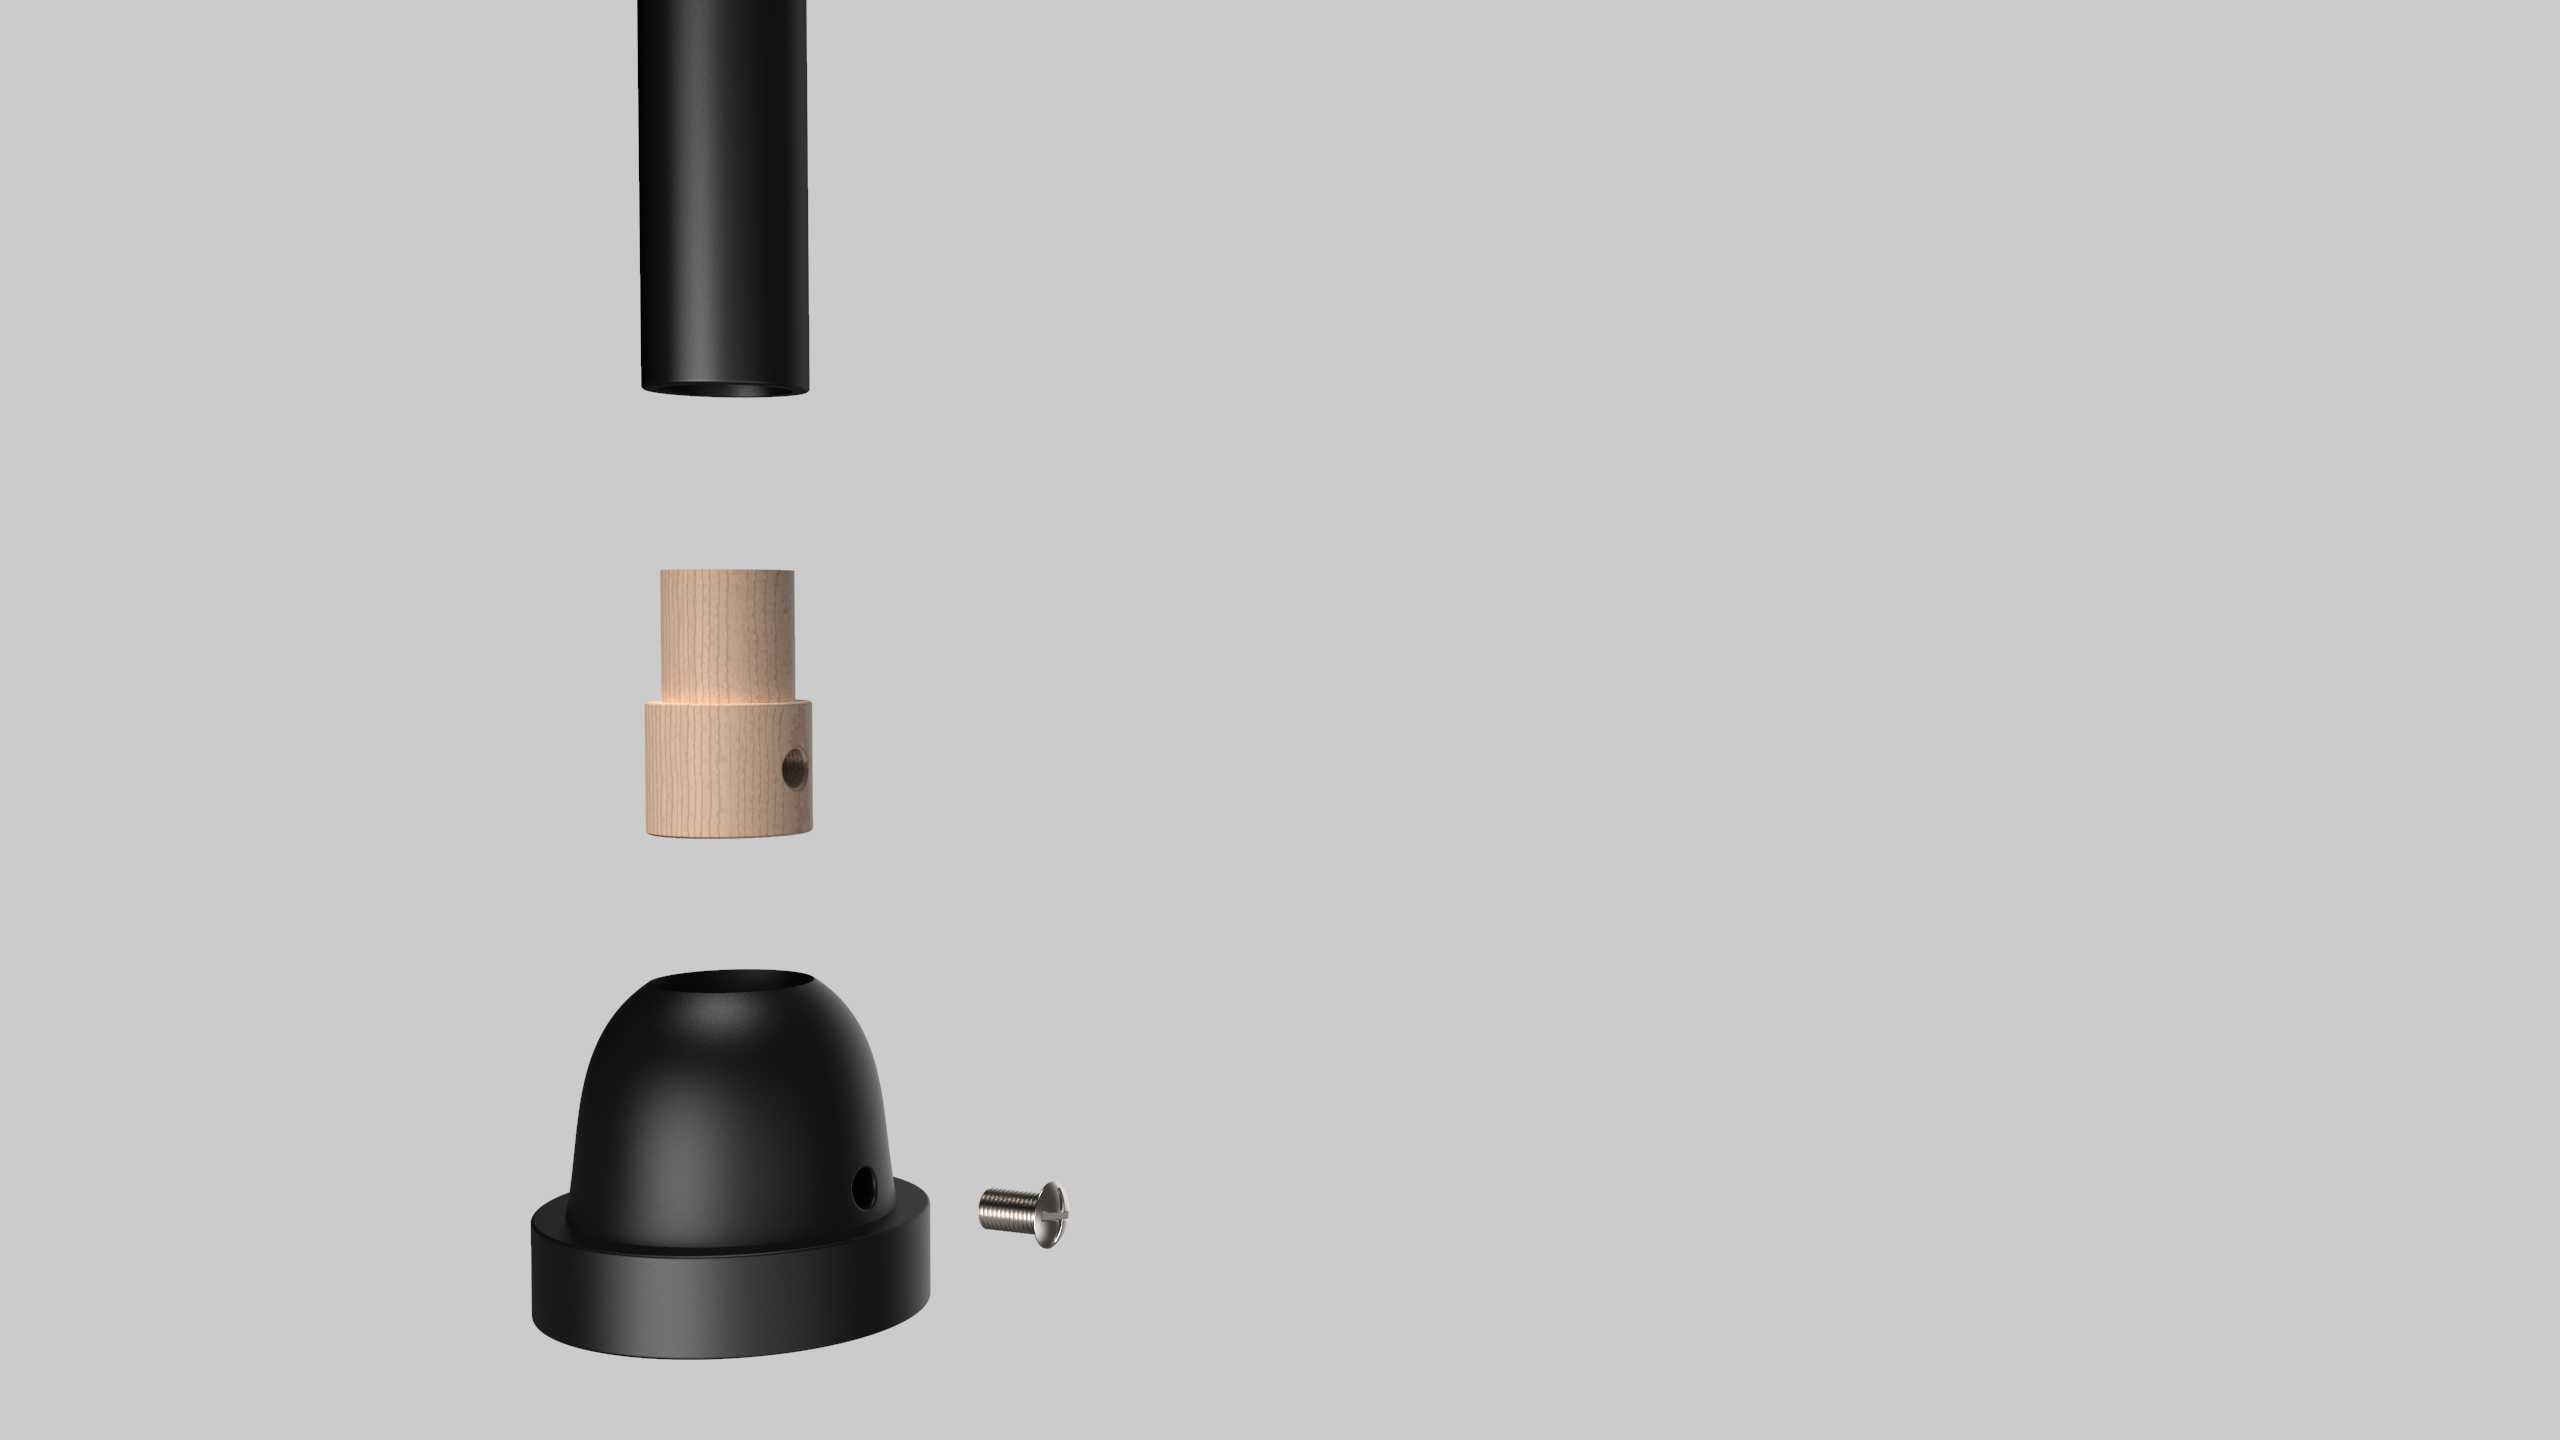
The pole consists of an aluminum tube, a steel connector, a carbon fiber tube, a wooden connector and anti-slip rubber. Instead of using a single-element pole, it was decided to divide it into two parts. This procedure greatly affects the functionality of the entire stilts. This gives us modularity – it is much easier to travel with elements that are approx. 70 cm long than with those that are approx. 1.4 m long. It also allows us to maneuver the individual parts.
The knee protection and the foot base are attached to the aluminum tube. When buying such a tube, we choose its length so that the distance between the foot base and the knee is appropriate and allows us to use it comfortably. This is part of the actual stilt. The carbon fiber tube is a replaceable element. This gives us the opportunity to order different lengths of the tube. Thanks to this, we will not need separate stilts for each of them – all we need to do is mount a shorter tube.
The stilts should meet the requirements of both beginners and advanced users. The replaceable lower part allows you to buy a tube made of aluminum instead of carbon fiber for beginners. Then we decide on a slightly lower comfort of use, due to the increased weight and lower durability, but we gain in price. At any time, we can replace the equipment with a stronger one, without having to buy a new stilt in its entirety.
A steel connector connects both tubes. It is glued on the side of the carbon fiber tube so as not to damage its structure, and is fastened with a screw on the side of the aluminum tube. The tubes rest on a 1 cm thick wall separating them, thanks to which the overloads are transferred directly from one to the other. The wooden connector is glued on the end of the carbon tube. Its function is to additionally dampen vibrations and to enable non-invasive assembly of the rubber to the carbon fiber tube. Thanks to this, the rubber can be replaced many times in case of wear.

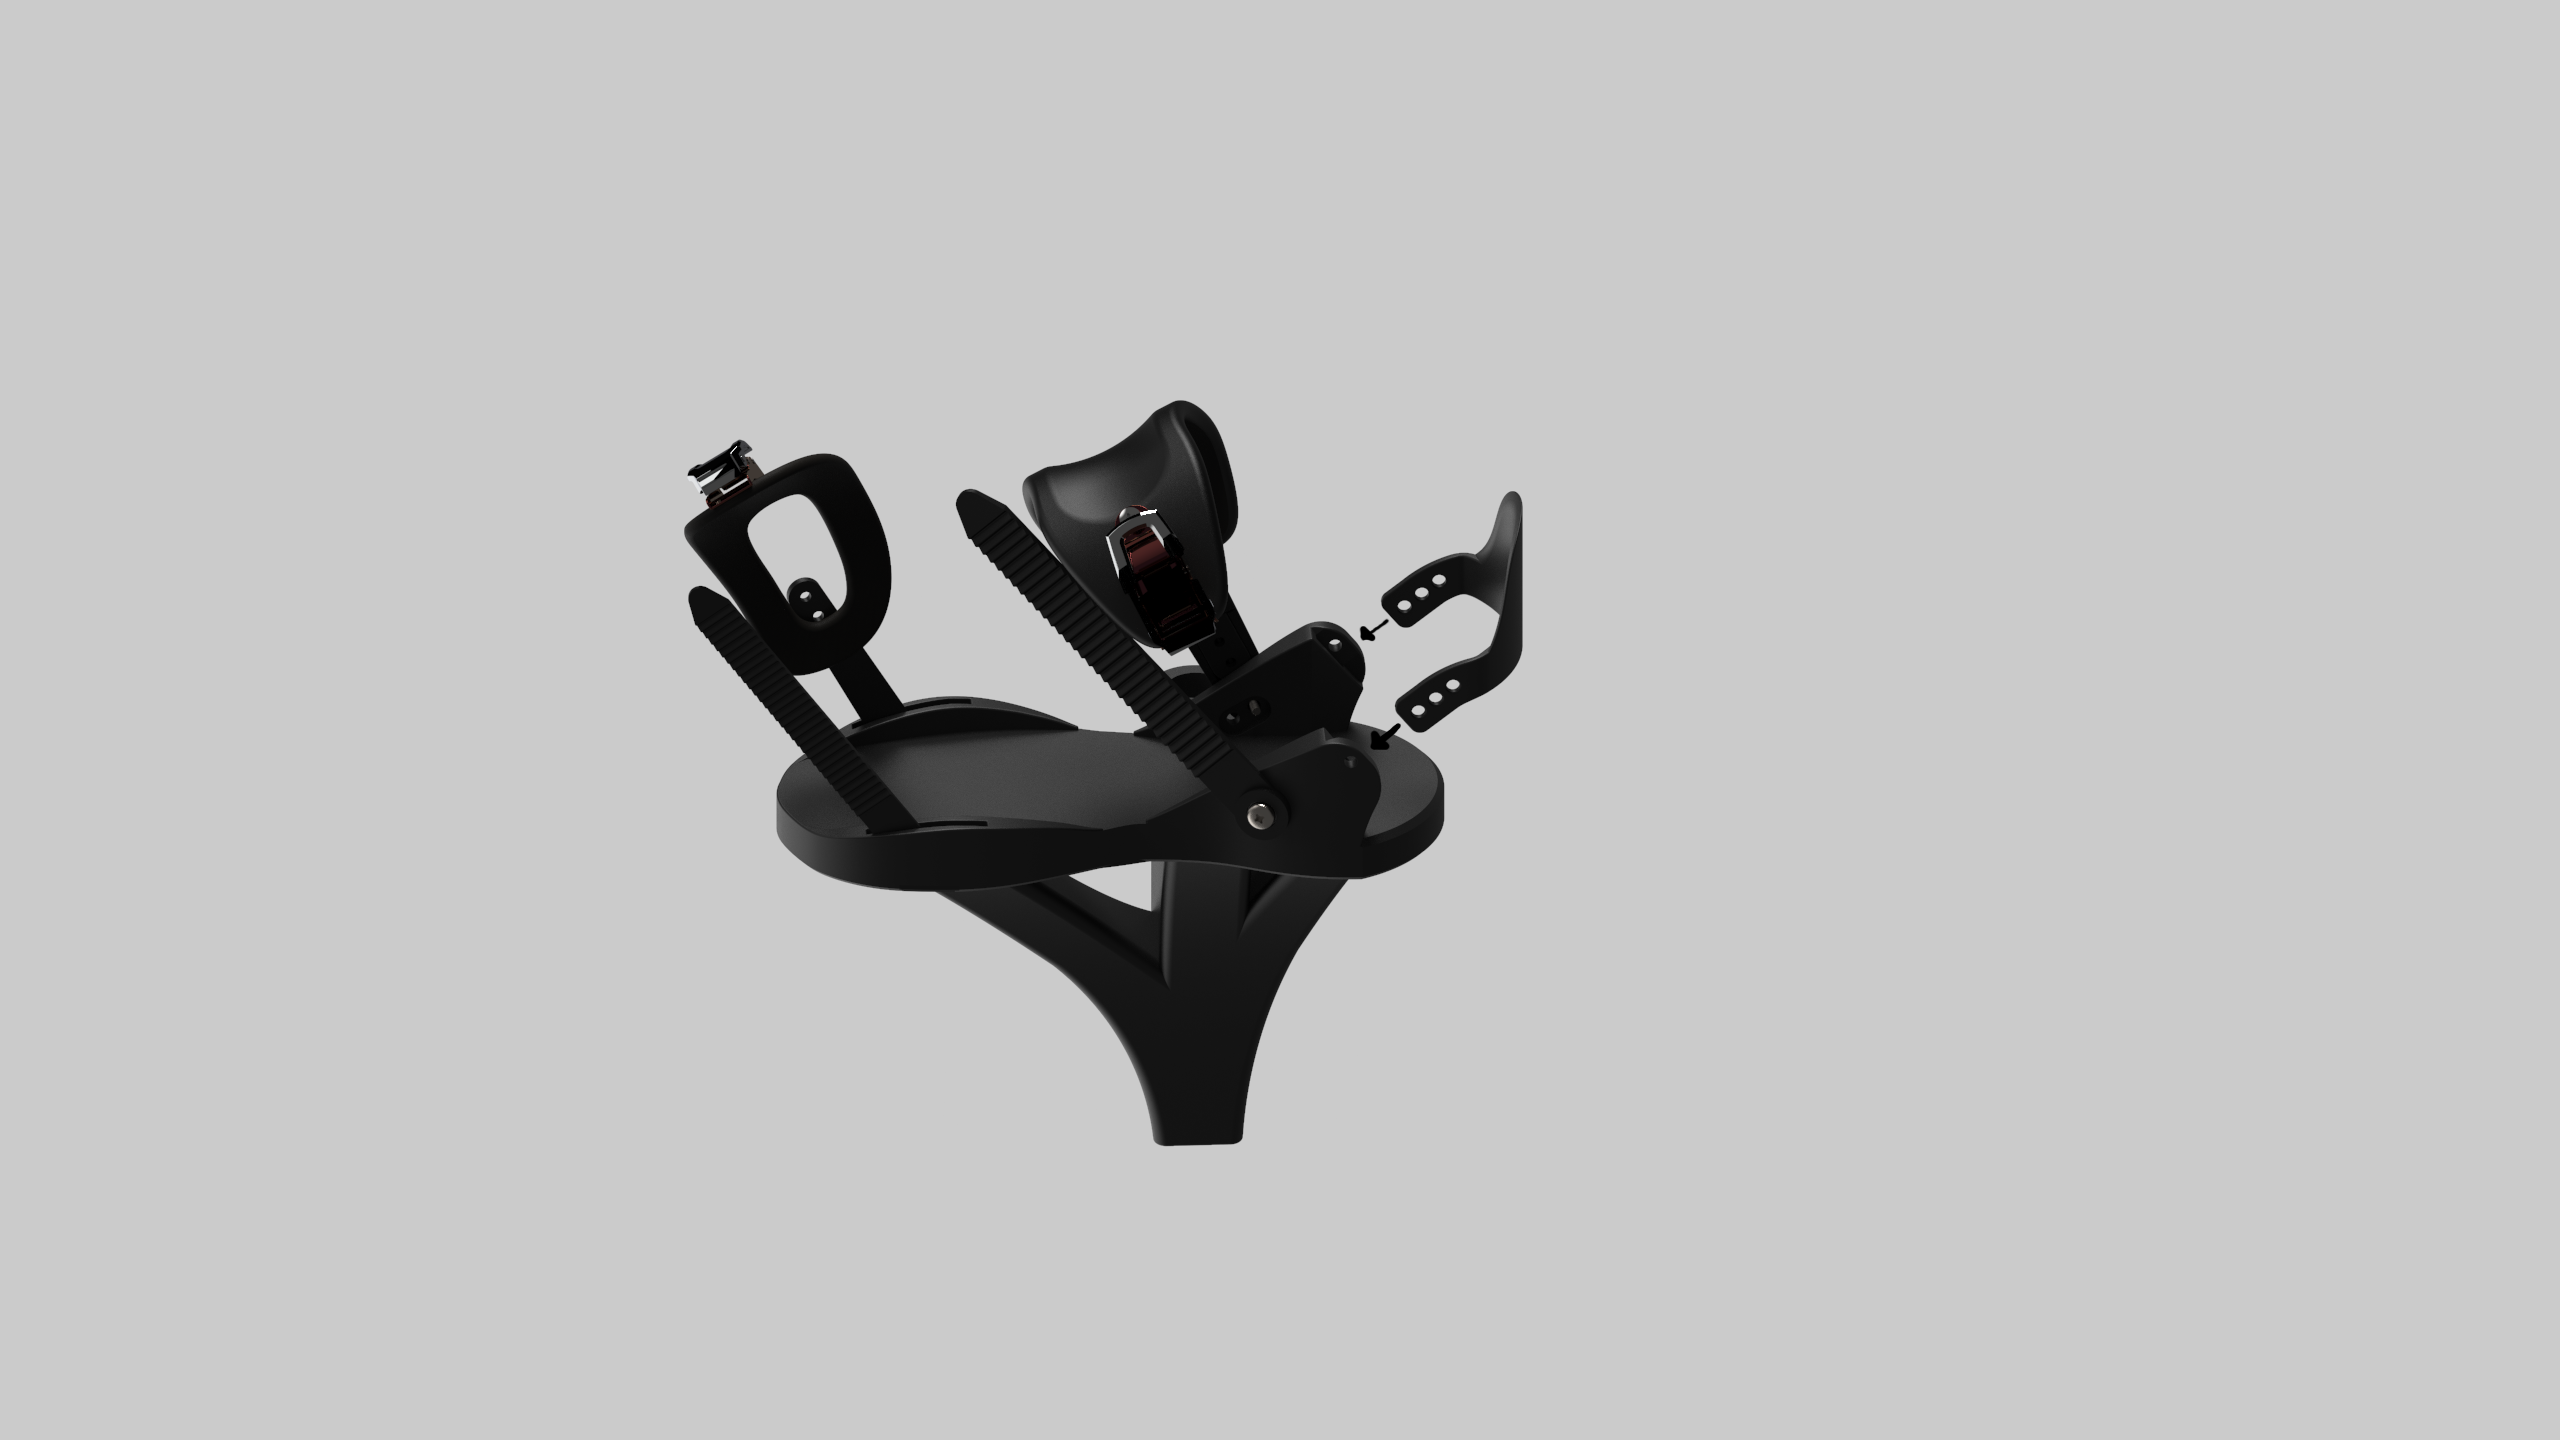
Foot base
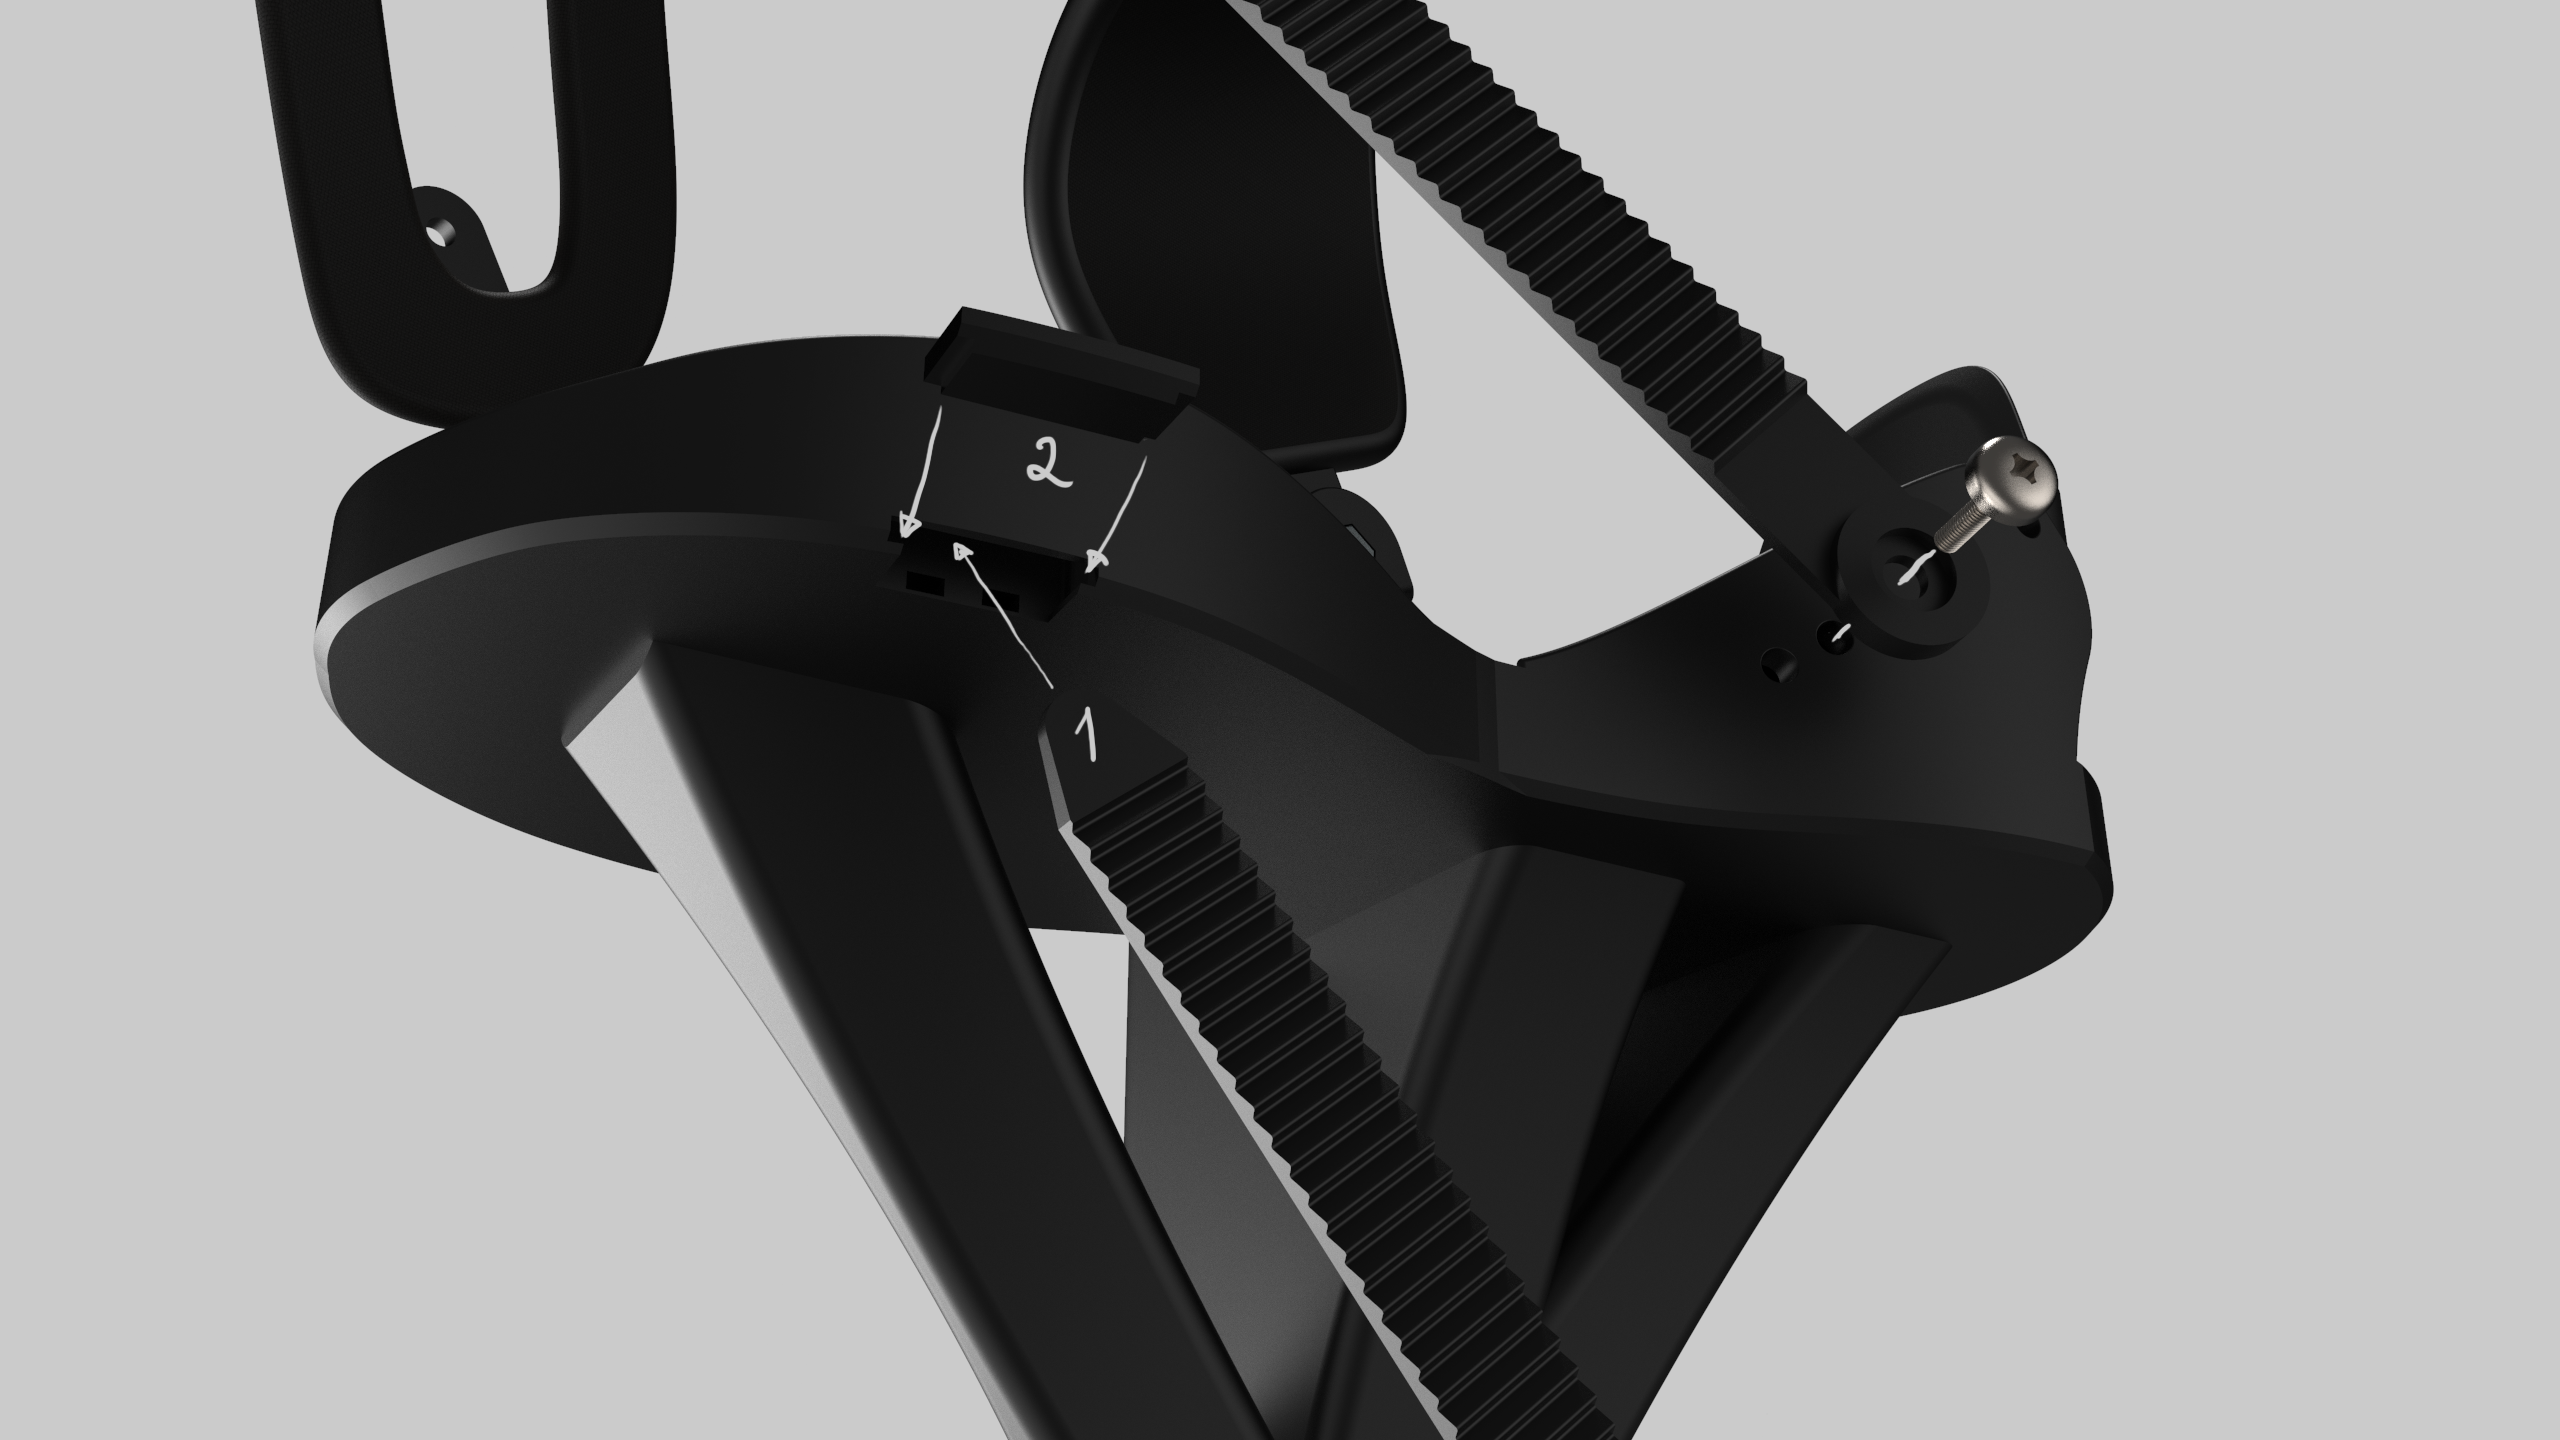
The foot base consists of the main base, a support, which is also the element that secures the base to the pole, and snowboard straps. The base was designed based on snowboard bindings. The model is made for 3D printing. Thanks to this, each model is adapted to the ordered size of the user’s foot. It contains adjustment in order to properly adjust to the length of the foot and its position in relation to the rest of the fasteners. The strap is fastened with standard screws for snowboard fasteners. The model is compatible with BURTON snowboard straps, available on the market, so you can easily find spare parts for them in the event of damage to one of them. The fasteners visible in the visualizations (straps) are ready-made straps. They are not part of the project. The method of mounting the straps is visible in the drawing. The support serves the base as a strength support and is an element that connects the foot and the pole. The base is permanently glued to the base and screwed to the pole. The whole thing after assembly is presented below.

final concept


